Pages

Tuesday, August 12, 2014

Tatting... counting... cutting... tatting

Tatting with beads can be very rewarding. And frustrating at the same time. Have you ever tried to add beads to an existing simple pattern? The pictots are nice to you, they behave. The beads on join picots and the ones on the core thread are nasty. Because they just replace a double stich somethimes and one has to take this in consideration.
I knew it, I got burned several times. Guess it will still happen.
The edging no 8902 from the Paragon tatting book no. 1 is one of the edgings I just love to do. I made a bracelet with this pattern:
Not a bad one. I do not like the fact that the trefoil does not lie really flat. 
So for the next attempts I changed the ds amount. And the threads. And added I pearl. Lesson no. n: never change more than 1 variable at the same time. 

Pattern itself is still wonderful: worked everything with a base of 8 and multiple of 8. But the fact that I worked it with 2 different threads (Penny 30 white and Range 40, silver) does not help. The pearl added 3,5mm in between. One  element only is beautiful. After the second  you can see: it refuses to go straight and when I managed it, then the silver part ruffles. Sue gave me some hints (Thank you!). Tried some, still have to work on. 
Until I find a decent, working solution, I rewarded myself with some earrings. At least some thread did not end up in the trash can. This time same thread, 2 shuttles, 2 colours, some ds changed. My pearl where I wanted it to be. I gave up the little turqoise flower on top I have prepared. 

From left to the right:
Shuttle 1 R1: 14 - 8
Chain 16
Shuttle 1: R2: 8 + 6 pearl (secure with paper clip) - 8, turn
Shuttle 2: R3: 16 - 8, turn work,
Chain: 16, turn
Shuttle 1: R4: 8 + 8 - 8, do not turn
R5: 8 + 16 - 8, do not turn
R6: 8 + 8- 8, turn
The rest the the first half, mirrored.

I let the bracelet idea with 2 colours wait for a bit. It is a full nonsense that I cannot find the right proportions for the ds for such a simple pattern. After the second of the third element, the small glitches punish me.
And since I hate to fix tatted jewelry... Why? Would you punish your costumers with a nice letter "instructions of use" where you tell them how to wash, starch and pin the bracelet? I work my pieces so they do not need fixing, I make sure that they are clean and then I use a nano-liquid which repelles further oil, fat, liquid substances.
Relaxing time gave this small medallion:
Love this little one! Again, seems easy, but if you do not make the right joins at the right point, the result if not nice. Definitelly a motiv to push further. 
Happy tatting. 

Saturday, August 9, 2014

The "what if?" syndrome and the "why not?" factor


Some time ago I tatted this simple bracelet. I think this is my simpliest since I shuttle tat. It was some time last year, the same time as the Chandelier earrings. Simple lines, seed beads only to join the 2 edgings. Simplicity has its effect. Always. 

Last week someone helped me rediscover it and asked for the pattern. Pattern? I thought. It is the very first thing someone learns in tatting after the flip, the ring, the rings and chains... I'd say it is the third pattern in learning to tat. But this stimultated me to push more in this direction.
It is what I named the "what if?" syndrome. You have a pattern in front of you, or you start to work something and you take a small break and the question hits: what if I make this chain longer? What if I close this ring over the braid? What if I do the join here and not there? I suffer of it. It hits me all the time. Remember, I cannot really follow a pattern. Now you know the reason. I see potential and the other thing, I know anyway to do. Even if after this I must throw away thread, I still cannot resist.
Then comes the "Why not?" factor. When the shuttles just start to do what they want (somehow). And sometimes I get a big flop (yes, I keep them), sometimes I get a small hit.
I had to work a bracelet for a swap. I was missing the idea when the what if syndrome hit me.
Revisited the small pattern with a small twist. 2 shuttles project, same colour, the beads added. 
After I mailed it, I wanted to tat it again, for me, to have it. And I got hit again: What if I work it with 2 different colours?
I works, I liked it. I got bold. The why not thingy... 
 

As you see, a 2 shuttle pattern. Seems easy, it is not really easy. It is not enough to be able to work with 2 shuttles, you must pay attention a bit to the different layers created. 

What you need: 2 shuttles, seed beads, crochet hook or something place the bead, paper clip to hold the bead. Patience. Lots of it.  

First half is easy. 

Shuttle 1
R1: 15 - 5, cl, dnt
R2: 5 + 9 - 9 - 5, cl, dnt
Take Shuttle 2, place the seed bead, secure with paper clip, start ring. 
R3 18 - 2, place the ring between the previous 2 rings, make sure that the thread of shuttle 1 will remain in front, close ring, do not turn. 
Shuttle 1: R4: 5 + 5- 10 cl, dnt. 
Take Shuttle 2: Start ring: 2 + (behind R2) 18, pass shuttle 1 through this ring (so it remains bellow the thread of Shuttle 2), place the stitches between R2 and R4, close. 
Remove paper clip, lock join with Sh2. 
Turn work. 
Chain (Shuttle 2): 18 ds (you can work 16 with no problem), snug, switch shuttles (SLT), turn. 
R6: 5 + 10 - 5, close turn work. 
Chain (Shuttle 2): 18 ds, turn. 
Shuttle 1: R7: 10 + 5 - 5. 
And so on. 
Personal remarks: 
1. The paper clip ennoys. If you find a way to avoid it, let me know. You can make a fake picot before you work R3, work the ring, close... 
2. You must at any moment check that the threads from Shuttle 2 will end up by being in front of the ones from Shuttle 1, so tou can have a clean join for the bead. I passed the thread of Sh1 through the R3 and R5 before closing. There are more that 1 way to do it. 
3 You can choose to work R3 and R5 one after the other, but make sure you make the right joins when you work the rings with Sh1. 

There are 2 variants of this edging, if you want to work 2 of them: 
The simpliest: 

The more complicated one: 
As you notice, you must work the rings with the Sh2 at the same pass. When you work the R4 (Sh1) make down join through R2 (difficult, but possible). Work R4, pass the thread behind the thread of Sh2, work R5 (up join through R3). Do not forget the order of the threads (Shuttle 2 in front of Shuttle 2).  If you do not do it, the transition between the rings is not smooth, and the backside of the work is not neat, the join with the bead is not clean. 
Have fun... or not. The bracelet looks really nice, so I will work it again. 
P.S.: do not start with the small rings, or at least do not finish with a 5- 10 - 5 rings... you will want to hide the thread of the second colour. This was my mistake, I had to make one...


Sunday, July 6, 2014

Dragonfly pattern

Now that the teacher in me knows that there is no step obmitted, I can post the pattern for the dragonfly.
Skills required: shuttle tatting, split rings, tatting with beads, optional.
It is a 2 shuttle project. The daring ones can also do it with 1 shuttle (Single Shuttle Spilt Ring).


Rough pattern:

R1: 12 ds.
R2: 8 / 8, cl, dnrw.
R3: 10/10, cl, dnrw. 
R4: 12 / 12, cl, dnrw. 
Sh. 1: R5: 25 - 15, cl, dnrw. 
Sh. 1: R6: 15 + 45, cl, rw. 
Sh. 2: R7: 25 - 15, cl, dnrw. 
Sh. 2: R8: 15 + 45, cl, dnrw. (or reverse, it is optional, but then choose the right shuttle)
Sh2: R9: 12 vlp 4 vlp 12, close, rw
Sh. 1: R10: 10 vsp 10, cl, rw. 
Sh. 2: R11: 10 + 10, close, cut, hide ends. 

Of course you can vary the ds to suit your thread. I worked it with something similar to the Lizbeth 40, so it is not too big. If you work with cotton, then you should definitelly re-think according to the maximim of the ds you can make for a ring. Or you trick it nicelly ad work chain, but for this, re-thinking of the beads sequence is necessary. 

Beaded variant: 


For this one, I strung on the shuttle 1 the beads for the antenae (as in this previous blog entry). 
Start stringing the beads: Shuttle 1: the 2 feeles then 11 beads , Shuttle 2: 11 beads. 
The result: 

In this case it is very important to work R9 with the Shuttle 1. 

For the purple variant: 


String the beads for Shuttle 1: the feelers + 24 beads, Shuttle 2: 10 beads. 
Between the split rings, you add the beads as described in the previous blog entry.

bs: bead brought from the shuttle (stays on the core thread)
bp: beaded picot

R1 (with 2 beads in the loop) 3ds bs 3ds bp 3ds bs 3ds close ring. 
R2: as described... 
R10: 3ds 7 bs sep by 2 ds, 3 ds close ring. 

Adding the beads, cristals is entirely up to you. My dragonfly will end up as a brooch. 


I have to thank Marisa di Mauro, she tatted the dragonfly only from the rough pattern, without having the ds given. Here is her variant. 
Happy tatting. 


Bits of technique: split rings with beads in between (diamond shape)

I am normally not too much into the theory, but because I want to post here a pattern (the dragofly), I really need to make this intermezzo.
Remember this set?
The middle part is just rings with the pearl ont he thread. This is not interesting me now. What I need are those split rings with the beads disposed as diamond in between. 
Long story short: it is a 2 shuttle project, CTM is perfect. You have to string beads on both the shuttles. Shuttle 1 will have, as a proportion, 3 times more beads as Shuttle 2. All the ds given are just for the sake of the demonstration. In the diagramms the beads have 2 different colours just to show from which of the shuttles are coming the beads. 

Shuttle1 : start ring with 1 bead in the loop: 16 close. The bead will stay on the core thread at the closing point of the ring. 


Shuttle 1: take 3 beads. 1 bead will come next to the ring, make loop with the other 2, work the first half of the SR (8ds). Lower 1 bead from the loop at the base of the ring, keep it in place. Take Shuttle 2, bring from this shuttle 1 bead at the ring, start the second half of the ring (8 ds). You should see the diamond formed. Close ring. The remaining bead from the loop will be the base of the next diamond. 


I needed to make this small tutorial for the tail of the dragonfly. Otherwise, that blog entry would have been a monster one. 
Have fun tatting. I know you will. 


Tuesday, July 1, 2014

Small flower, another way to add beads?

This was my intented post today. Got lost because of this chain I promissed to try/do/test.
A small flower, more like a violet, but this is just because of the colors.

Get your material toghether: thread (Tenax 30 /Lizbeth 40) , 1 shuttle and 1 ball (CTM), 35 seed beads (I used 11 Toho delicas). This time you will really need a beads threader or something appropriate (this tiny wire foldet in half is just perfect). A crochet hook will not be enough, trust me.
Pattern? the most boring ever: inner ring and then, round 2, all chains.
For a 5 petals flower you must string the seed beads to make the 5 centers for the petals.

1. String 4 seed beads

2. Take 3 more beads

3. Pass the threader through the previous beads so the last 3 becomes a picot. 

4. Snug. It shoud look like this.

5. Repeat 5 times. 

6. Work the inner ring with these beads in the loop (you will use them as beaded picots, marked B): 3 B 3 - 3... repeat until you have used all the beaded "stems", finish with 3 ds, snug, close ring. 

If you must move the beads, do not worry, just hold the bead on top and move it in the direction you need. You will be surprised how easy they are to move. 

7. Start chain, you will use only lock joins: 12 + 7 + 12 +- Feel free to adjust them to fit your thread and beads. 

8. Cut and hide the ends. Mine are not yet done. 

This little flower will get some sisters and will end up on a bracelet. But with some planning, it can give a delicate pair of earrings, a necklace.  You can also play with the colours for the beads: 


Notice the feelers? They are done with the same method. 
Happy tatting, have fun!

Hello, Jaden!

Sone days ago, Jaden asked me if I can think about a way to still make the beaded chain (Nina Libin way, but with the beads on top of the rings. The chain itself appears in all antique tatting books. It is this simple rings chain with bare thread in the middle to climb to the next one. No genius fact in this one. The genious idea came from Nina Libin, to place a bead and the make the pulled join!
Tricky!
The chain by it self can be done with no problem, work ring that the bead fits in (some prior tests needed), close ring, place bead, make lock join or instead of making the join, pull a loop, start the new ring (make sure the the free part of the ring stays under, otherwise you will not be able to close this ring):
I also applied the same technique for the 2 pearls from the bottom of this necklace. This time I made the rings a bit smaller and placed the pearl on top of the lace. Pretty nice effect. 

I tried hard to make a combination between the beaded chain (with the collar) and the bead on top. Did not work. I tried to change the order of working the rings, to make all kind of joins, passed the shuttle in various ways, let it fall. It is not working. And you will see why.
I made a very quick tutorial for the beaded chain but with the bead between the rings. This is for you, Jaden, maybe the bracelet will turn out like you would like it.
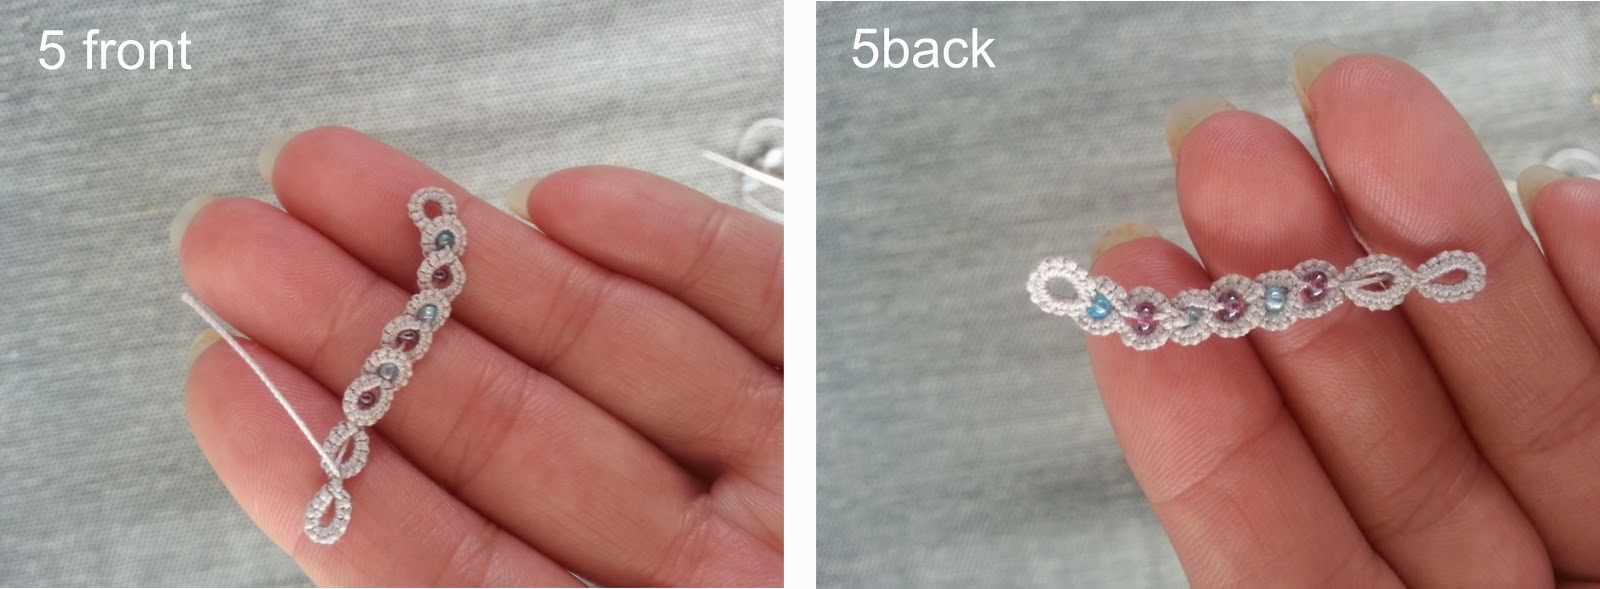
Fill your shuttle and string the beads. I used baby blue seed beads between the rings, and purple ones in the rings. But you can also use 2 different sizes of beads, add beads on the chain...
Work a ring. Up to you how many ds. Bring the bead you want to place between the rings. 
As close as possible from the bead, work the next ring (with the vsp); this time your next bead has to fit in. 
Work the collar ring as big so the bead gets in it. Make sure you have the starting/closing point of this ring on the backside of the work. 
As you see, on the front side it will tend to "embrace" the bead, on the back side it will tend to stay on top of the bead. 
Make the join to fix the bead in place. 
Repeat the sequence for the desired lenght. 
The last non-beaded rings are my some of my tests to work the rings differently or to make another join. Why it will not work? look the back side: the purple bead gives a "lift" to the horizontal ring. If you try to change the sequence, it will not hapen or the appearence is not the same. 
Back to Jaden: 1 thing I did not test yet: work the collar, do not close the ring, prepare a join so the thread remains in the middle of this ring but on top of the ring of the chain, then carefully close the ring, finish the join and place the bead. Gave it shy try yesterday, got my fingers and nerves lost between thread, crochet hook, shuttle and fingers. 
Happy tatting. 
If someone smarter and more stubborn than me finds a solution to Jaden's riddle, may I know it too? Thank you!


Wednesday, June 11, 2014

Beaded chain, Nina's Libin method

I empty my shuttles and play, or learn, or test while I am doing it.
This time I had some beads on the shuttle, so I fooled around with some rings and beads. I used Nina's Libin method: tat the ring normally and then climb on top of the ring with the bead which will stay in the ring. So smart and simple. What I added was this little "collar". It ended up to be a nice chain or braid and I intend to use it as the middle part of a bracelet.


How I did it:


Starting point.


Work ring


Turn work that you have the starting end of the chain to your right, wrap the thread to make a ring.


Work the ring and close it. Do not rush, you want it to close nicely, on the back side of the chain.


Bring 1 bead from the shuttle and place it in the ring.


Make lock join to fix the bead in place.

Of course, I could not resist, and I made a variant, by bringing another bead between the rings: 
After the lock join, bring one bead, make the next ring. Turn work, make "collar ring", close, bring the bead to place it in the ring. 


I worked this with Lizbeth 20, my beads were 1,5 mm. I used for the normal ring: 4 - 4 vsp 4 - 4, and for the collar ring: 12 ds. 
For the variant, the collar ring had 14 ds, so it lays flat. 

Remarks: 

1. Do not rush! The horizontal rings are a bit stuborn to close. The closing point has to be always on the back side of the work. You cannot trick it, it does not have a nice appearence. 
2. Choose, if possible, beads with a bit larger hole to place between the rings (for this variant). The lock join knot will be hidden by the hole and the chain has more stability. 
3. Make a test before, so you can know how many ds you will have to use. 
4. Careful when you start any new ring. No thread should be left visible. 


When I make my lock join I use a small trick, like this I do not have any surprise and I do not have any bare thread by accident. I pull the thread like for the Catherine Wheel join but I do not let it pass to the other side. I snug this loop by pulling the shuttle thread in my direction (holding the thread under my left thumb). Like this the knot is very tiny and even. I do not know if this was done before, but it works for me. 

I hope you will give it also a try, just tell me how it turned out. 
Happy tatting.