Pages

Showing posts with label tatting with beads. Show all posts

Thursday, June 30, 2016

Pulled loop join


It  sounds long and scarry... But it is a join done with the shuttle thread, just a lok join, since all rings are worked with only one shuttle. In the old patterns, before Ann Orr taught us to work a split chain (1916)  you find this chain of rings with some bare thread behind. Today we would work this with 2 shuttles and make split rings. 
But going back to the roots, can help. You love beads? Any bare thread can carry beads and this piece is no exception. Nina Libin is also using is. I also like the pulled loop join because it allows you to pass at the top of a ring with a neat effect and, since it is a single shuttle technique witl the beads on it, this makes the project really "portable".
In this piece from the pìcture there are 2 little technical details: the pulled loop join and the horizontal ring. I call it collar ring because of the appearance. Have no idea if it has a name, this little fellow. 

Thred the desired beads on the shuttle thread and work trefoil. My case 5-5-5-5 (I worked with Sunlight 40 and 3 mm coral beads). Go back to the middle ring of the trefoil (make a join), take 1 bead and place it behind your work, pull the thread and make the lock join carefully. Done.
Help for it here (Karen Cabrera, of course):
Start the new trefoil, repeat the whole sequence. Turn the work  90 degrees, start a ring wraping the thread around the work between the 2 trefoils and work a 10 ds ring. Close  this ring in such a way that it closes on the back side of the work, bring the next bead, make the pulled loop join.
I used this for a bracelet and I also made another round and used also the outer picots.

Sunday, September 6, 2015

Rosette with beads, funny beads

This is about the small black rosette I published some days ago... Love to tease you, love to make you find solutions. This helps a lot to get out a bit outside the box.

One box we are stuck in sometimes is the way to add the beads. They must come from the thread from the hand, from the shuttle or the needle or is has to stay on a picot. Really?? Not this time.
I tricked it. I am not the first one and there are more than 1 way to have this effect but the simpliest one, at least for me, will be described today.
This rosette has 2 rounds. The inner one as pretty easy.


Image
Steps and remarks
 
 What you need: 
Your thread. In my case, Penny 20 this time. 11.0 rocailles, a very fine crochet hook and a beading needle. Or any needle which allows you to pass 2 times through a 11.0 rocaille. 
String on the shuttle the beads you need. you must think: 8 beads for each petal. In my case, I needed 7 petals... 56 beads. Just put enough beads on the shuttle to be on the safe side. I was sure I will get a 6 petal flower... I had to unwind the shuttle and add the missing beads... 
Prepare to work the inner round. Take 11 beads on the hand and work ring. 


 Work 8 ds 4 bp 4 ds 3bp (2 from the hand, 1 from the shuttle) 4 ds 4bp 8 ds, close ring. 
4bp: 4 beads picot
3bp: 3 beads picot
Do not work these beaded picots too tight, you will want to have some thread for the next joins. 


 Petal 2 until 6: 
take 7 bead on the hand. 
Work 8ds join to the beaded picot by separating the beads (3 up, 1 down) 4 ds 3bp 4 ds 4bd 8 ds, close ring. 


 Intermediate phase. 


For the last petal taker only 3 beads on the hand. You will make the last join as a folded join. Do not let yourself impressed by the beads. 
Finished first round.  Cute enough actually like this. 


 We attack the second round now. I placed the small rocailles on top the the picots with 3 beads... This is where I want them to be. 
Therefore, I let my shuttle away and I use a needle. Remember? The needle  supposed to be able to pass through the 11.0 rocaille 2 times... But please keep in mind: the bead will have 1 thread in the hole... when you pass with the needle you will have in that little hole 1 time the diameter of the needle and 3 times the diameter of the thread. When I will explain how it will be done, you will see. 
Anyway, because of this simple math and some tests I had to use for this round Penny 30, a thinner thread. 
The needle will be used as a shuttle. 


 Thread the needle, let enough thread on the needle. It will be you core thread for the outer round. Don't make economy on it... you have some joins too. Do not cut the thread. You will work with the ball too. 
Take 1 bead, keep the rosette in place and bead and pass the needle through the 2 beads on top. 


 Now pass the needle back through the bead. Fasten.


 Done. Not hard, no science involved.
Now you can start to work the chain. Needle tatters will be disappointed: I am tatting with flipped ds. 


 I use for this the Riego tatting method. (Please correct me if I am wrong.) 

First movement / first hs
Wrap the thread on your left hand and prepare to work chain. 
Pass the thread from the neddle on the left side of the active thread (the ball) and bring the needle under the active thread as shown in the picture. Pick the needle, make the flip. 


 Second movement / second hs
Bring the needle from right to the left, pass it under the active thread. Make the flip. 
Congratulations: you just made a ds using a needle as a shuttle. 
Again: I did not invented it. I guess it was already done before me. 


 Easy peasy. I do not give you any ds count for the chain. It depends so much on your thread... My Penny 30 wanted 26 ds to lay flat... 
Take 1 bead, place it, continue... 


 Have fun. 


I hope this is not that difficult. It is actually fun and you will notice how wasy using the needle this way can be. The same movements I use also when I am finger tatting...
Let me know if you do  not understand some steps. I will try to answer as soon as possible.


Thursday, July 16, 2015

Small earring

Remember this one?

Bracelet

I played with the idea and the last one I uploaded. The basic idea is the same: 1 shuttle, all the beads strung previously. And with a crochet hook and some decorating beads, this is all you need.
Remember the small rings? You take 1 bead in the loop before you start the ring, work the ring and close it. The bead will remain on the core thread, at the base of the ring. If you are needle tatting, just work the ring and before you close it, take 1 bead and then close the ring. 

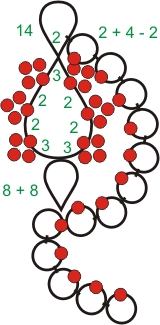
The left diagramm indicates the order of the work, the right one: the ds. Please note that you can adjust at any moment the double stitches and the small rings according to the thread, beads you use. You will feel it while you work it. 
I used a Brildor PB15 thread, a thin polyester (like an 80 size thread) blended with gold metallic Finca thread. 

1: R: 2 - 14, close, do not turn work. 
2: R: 3 dbp 2 dbp 2 dbp 3 - 3 dbp 2 dbp 2 dbp 3, close, turn work.
3: R (with 1 bead in the loop): 2 + 4 - 2, close ring, do not turn work. Repeat how many times you want, until you have a chain you like around the larger ring. Keep in mind that you must have space to work the 4th ring underneath the larger ring. In my case: 8 times. After the last small ring: turn work. 
4: R 2 - 6 + 8, close, turn work. 
5: R: 2 + (the the previous ring) 4 - 2, close ring. Make lock join to the picot from the previous small ring. Continue without turning work for as manny small rings as you wish. Last small ring will be a 2 - 6 one (no picot needed anymore). 
Now you can add the desired beads, by sewing them. 
Small remarks: 
- Do not rush when closing the small rings. It is not always easy to close them all the same. 
- Make the joining picots as small as possible. 
- While sewing the beads, use a fine needle and pass through the beads of the small rings. This will give more stability and stiffness to those chain-like elements.  Especially the longer one may need it. Pass through the bead, hide the thread between the ds, pass through the next bead. It takes time, but it is worth to do it. 

Have fun! 


Tuesday, January 20, 2015

Beads and tools

This entry will not be so impressive, but it might be helpful.
It is about beads tatted withing the lace and the tools you need. For the ones already familiar with the tatting with beads, sorry, no new territory. But, if you have some more hints, please share them with the newbies.
These would be beads you might consider to tat at the same time as the lace. Again, sky is the limit, it is just to get an idea.


No, no bead in the middle of a ring, no big bead tatted in Ankars. Except the ones used already as a joining element. But it is safer te work the elements separatelly and to join them while decorating the foundation than hanging a heavy bead. Ankars tatting is about beauty, perfection as it can be and resistance at the same time, the tatting skills stay more with the technique to create a perfect base for the beads than to incorporate the beads into the lace.
Recommendation: the smaller the beads the better. Preferably: even beads, especially when included on the core thread. This is changing the proportion little by little. For 3 rocailles 11.0 you will change the dimension of a ring by 3 mm. Funny. This brings us always some frustration while adapting an existing pattern.
Small bead = tiny hole. A truism which can really hurt. 11.0 Miuki has a hole of 0,8 mm, A 15.0 has a 0,7 mm hole. This is huge! And this can create problems to work with the beads, to string them on the thread. Not to speak about the choice of the thread.
Normally, I  use what you can see here. Forgot the place a paperclip. Important that one too.
Beading needles. Not only to sew the beads on the lace, but also to string the beads. And yes, a 10 size beading needle can be used with a thread similar to the Lizbeth 40. I did it. Never forget when choosing the beads and the thread: when you use a needle, a beating tool, a threader, you will always have a strand of 2 when you string your beads.
How to skip it: apply glue to harden the end of thread and try to use it. Not my favorite choice, though.

My "tool". Done from broken guitar string. My son knows already: I receive all his broken strings.
I prefer an open end to the ready-to-buy variant. A lot more versatile.
How to make it? Take some 10 cm of a tiny wire, (from electrical cable, from craft copper wire, the 0,3 is perfect, a fishing wire), fold it 2. Done.
For what it serves? To string the beads, to place the beads on the picots, to make difficult joins, to place beads/elements the fine crochet hook cannot place.


Crochet hook. We know it. The finer, the better.
Perfect tool to string individual beads, to place beads on the picots.
Why finer? Not only because the holes are under 1 mm but also because sometimes the joins can be done in between the beads:
In these cases I tend to use my tool. 
Limits: cases like this one: 


 So you turn to the cheap wire tool: place it on the thread, place the bead, fix the paper clip.
 
 
The smart ones will make very long (gauged) picots. Viable solution when you work with regular beads. What about the irregular beads?
See the last picture? it is what comes next int he blog: placing the seed beads and using them not only as decorative elements.


Tuesday, January 13, 2015

Simple ROR earrings

Those ones were waiting to get a how to tat history... And since I would not like to tempt some tatters to try to estimate, I just rushed a bit with the pattern. Which I promissed anyway.


Skills required: shuttle tatting, tatting with beads, up and down joins. 

Small reminder for the ones liking a neat finish, no twisted picots. Never fight against the thread. This always can punish sooner or later. Better learn the right technique than making compromises to the quality of your lace. Not even when worked "for fun". Yes, I've been told this one too: "We do not work at an academic level, just for fun."
· Up join - marked with + in the pattern (the regular one, the one we learn at the beginning) will make that the ring you are working lay under the rings already worked. Reason: the thread you pull from the left hand to make the joining loop brings the worked ds from underneath the work. You will pass the shuttle also from down towards up.  
· Down join - marked with * in the written pattern: when you pull the thread to make the join, the worked ds are on top of the previous rings anyway and the shuttle passes from left to right ON TOP of the work, so this ring will remain on top. 
That  simple. 

There you go for the pattern. 
1 shuttle project. 
Material needed: thread of your choice (my Penny 30 gave me a 2,5 cm long earring), 28 seed beads (29 for the daring variant, with the tatted in crystal). Beads of your choice for the finish. 

Shuttle, beading threader, fine crochet hook, scrissors, needle (for the finish). Magic thread trick is beautiful, but maybe you would like to place 1 bead and then hide the thread. 
All the picots will be very small picots.

Basic pattern: 

8 rings worked in the given order. 
R1: 5 - 5 - 10, cl, dnt
R2: 10 + (to R1)  20 - 10, cl, dnt
R3: 10 + (to R2) 5 - 5, cl, dnt
R4: 5 + (to R3) 10 - 5, cl, dnt
R5: 5 + (to R4) 5 - 10, cl, dnt
R6: 10 + (to R5) 15  - 10, cl, dnt
R7: 10 * (up join to R6) 5 - 5, cl, dnt
R8: 5 + 10 + (folded join to R7) 5 cl, cut thread. 

The beaded variant requires the use of the beads. Known already: 3 beads in the loop for the ring, 1 from  the shuttle to form this diamond (marked dbp in the pattern).  All rings will start with those 3 beads in the left hand, except the ring 6. Feel free to change it if you prefer it. 
String on the shuttle 28 beads. 

R1: 5 - 5 dbd  1 - 11, cl, dnt
R2: 11 + (to R1) 10 dbp 10 - 11, cl, dnt
R3: 11 + (to R2) 1 dbp 5 - 5, cl, dnt
R4: 5 + (to R3) 5 dbp 5 - 5, cl, dnt
R5: 5 + (to R4) 5 dbp 1 - 11, cl, dnt
R6: 11 + (to R5) 15  - 11, cl, dnt
R7: 11 * (up join to R6) 1 dbp 5 - 5, cl, dnt
R8: 5 + 5 dbp 5 + (folded join to R7) 5 cl, cut thread. 

Now, you are ready to embellish your earring as it pleases you. 

For the daring ones, I tell how I worked my earring. Not a big thing, bit it requires a bit of patience during the work. I like challenges so I tatted in my crystal. I placed all my seed beads on the shuttle and also the crystal blocked with a seed bead, like for the free stamen for the Sakura patern. 
The beads sequence to fill the shuttle is: 25 seed beads, this crystal with the seed bead blocker, 3 seed beads. 
Start from the ring 2 with the 3 seed beads and the crystal + blocker in the loop. When the ring will be closed, the cristal will remain trapped at the base of the ring. Then you must tat  the ring 3... In this case you should not have any folded join. Only take care about the placement of the layered rings. 

Have fun. For any questions I am always around. 
Happy tatting. 


Saturday, November 29, 2014

Ankars tatting rules for a simple pattern

Please, do not make the mistake to believe Ankars means stacked rings, 3D tatting and multilayered pieces.
This technique uses common tatting patterns but there are some details which make from a common pattern an Ankars piece.
- work it with shiny, resistent, polyester thread (Lavsan, Isacord, Brildor, any machine embroidery brand you find as long as it is resistent, shiny, not elastic).
- tat the ds according to the Ankars requierments: right hand completelly still, no moving, thread tight, form the knot with the left hand. This is Rina Stepnaya's way of tatting for Ankars. This makes a stiff lace. The video of Karen Cabrera shows it perfectly. Remember it looks like regular tatting, but this makes the difference:

- combine 3 or 4 strands, one of them can be easily from a different colour or metallic.
- choose good quality beads, even ones (Toho, Miuki, quality ones).
- plan your beads to tat it the lace with extreme care.

I will show you how a simple tatting element can become Ankars. I admit, not the spectacular one, but it is something different than tatting with beads. And no, beanile is not Ankars, Nina Libin is clear about this one.
The simpliest rosette ever. Tatted with polyester thread (Penny 30), really stiff. All gold Toho rocailles 11.0 are tatted in.  The white and the red ones are sewed. This is one of the ways used in Ankars. 
You need to tat the rosette: 
12 x 4 = 48 beads for the rings (they will be on the shuttle). 
6 beads on the ball. 
To finish it: beading needle required 6 Toho white, 6 Toho red, 11.0 size. And 1 finishing crystal (if you wish). 

All rings: 10 - 5 - 5 - 10. 
All chains: 25. 
All joins are done between the beads. 

R1: take 11 beads in the loop. 10 ds, bring from the loop 4 beads, 5 ds , bring 3 beads from the hand, 1 from the shuttle, 5 ds, bring the last 4 beads from the loop, 10 ds, close ring, turn work. 
Remark: when you make those 4 beads picots, do not make them too tight. You will want to have some manoeuvre space when you make the join. 
Chain 1: bring 1 bead from the ball, hold it tight, start chain. 25 ds, snug as tight as you can (too bad for the aspect if you work with coton), turn work. 
R2: take 7 beads in the loop.  10 ds, join between the beads, 5 ds, make the diamond beaded picot, 5 ds, bring the 4 beads from the loop, 10 ds, close ring, turn. 
Repeat until you finish the flower. 
The last join is a bit difficult, make sure you make it between the right beads. 
You will notice that the flower is not stable in the center. 
You just come with the beading needle and wave in the beads you kept for finishing. My piece gained in stability after sewing the red ones. The white I added in fact just to bring some contrast. 
I played with one of those beaded centers by adding a 4 hole pearl and giving some volume to the piece. 

Do not be afraid of experimenting. But if you want to make an Ankars piece, just respect the Ankars basic rules. This way of making the ds will improve your tatting too, since this movement forces the thread to wrap better around the core thread. As for the beads, unleash your imagination, sky is the limit! There is actually no Ankars pattern... the originality comes from the way the elements are combined, the beads scheme and the colour scheme. 
Have fun and happy tatting. 


Tuesday, November 18, 2014

Pattern Sakura

For a tatting exhibition in Japan, organized by the Romanian Embassy in Tokio, I made a hair comb using the symbol of the Sakura.
The pattern is, again, not the important element here, but the technique, the way I made those little beads to make the floating stamen.

In order to do this you need to prepare your beads, a beading needle or simply something to allow you to pass a second time through the beads. I use just my guitar string, I think you saw it in action several times. 
Material needed: seed beads of your choice, stringing tool (dental floss, beading needle, your choice), 5 paper clips. 
1 Shuttle and ball (CTM). 
Technical difficulties: none! Just a nice mock picot and lock joins. Manipulating the beads and making clean lock joins is task enough.   
The Sakura has 5 petals, sou you will need to string 10 stamen on the shuttle and keep aside the beads for 5 others which you will string while you work. 
Preparing the beads: 
 
 Before filling the shuttle, prepare the stamen as follows: 
string the beads for 1 stamen. 
 
 pass the beading needle through the beads except the last one. 


 Snug. Done. Prepare to make the next 10 ones. 

Fill the shuttle with these stamen on. Group them by 2, leave some space in between them so you can use them when you need it and still have thread to work the needed ds. Do not cut the thread. 
The central stamen will be a long beaded picot secured with paper clip, so make sure you have all the material ready. 

Start ring with all the stamen in the loop.
Working sequence: repeat 5 times: 3 ds stamen 1 ds beaded picot with paper clip 1ds stamen 3 ds picot. 
The central part is done, you have all the elements ready. 
Note: 
· Patience is needed to manipulate those beads (stamen), but it is easy: just take the upper one and move it... 
· Try to avoid beads with cutting edges.  

Next step: all chains and lock joins. I used sequences of 15 ds, but please, adjust them to fit your needs. I choose not to make any join between the chain, I like the way the petals just superpose. You can use the Catherine Wheel join, but I prefered to interrupt the core thread, to have a nice angle. 


In the picture of the comb, you have 3 different ways to use those stamen. 
Left one: long beaded picot. Simple. 
Middle: you have now already the directions. 
Right: 1 stamen used as a bead at the base of the ring. It is working and the beauty is that it can be done not to lay flat. 
Hope this helps. 
Have fun tatting. 


Sunday, November 9, 2014

Tattings versatility

This what I like in tatting. This versatility. If one dares, of course. And this is what I always try to tell to anyone asking for hints: dare to be original, change a colour, do different combinations. Alter a bit. You will may not change to too much to be entitled to tell: "This is my pattern", but this little piece will have your signature. And will make you proud.
I revisited this pattern, from the stud earrings:
And I tried some finishing ideas.
 
If is absolutelly the same pattern, the same elements used. Except the 6 agat beads (2 mm), added to the inner element (sewed in). 
Also same one. This time I sewed the coral beads and the Toho 15.0 rocailles. And yes, you must sew the inner beads, there no way you can properly work the rings and add the beads as they are added.

By far, may favourite is this one:
Same basic pattern. Changed from 4 beads to 3 beads in between rings. This does not make it a new pattern. I added the outer chains, like for the beaded flower here:
Combining the 2 together, this may be an original? Nope. You can still point to to the originals. So again, no new pattern. But I got out from the boredom of working over and over the same thing. 
The pattern for this one? hard to give it to you. With my Penny 30 and my 11 Toho beads: 7 lj, 6, lj, 7, lj, 7 lj... and so on. Lock join between the beads as you see in the image. 

Just have fun if you dare ;) Just dare!
Happy tatting.