Pages

Showing posts with label paso a paso. Show all posts

Saturday, October 31, 2015

Necklace "Bow" pattern

Necklace “Bows”pattern

I played with 2 shuttles and some self closing mock rings, love it. Then I wanted to climb to the top of the SCMR with both threads and this is how the beads got in play. Made some elements, drunk some coffee, watched TV and then it hit me. Maybe you know it: take a small break, think that you are watching TV (tennis for me) but the brain is still tatting. Then the finger starts to draw in the air (this amuses my husband always) the the pattern starts to build itself.

2 shuttles, CTM, fine crochet hook, 5 mm rice mother of pearl beads. This is all you need. Skills required: nothing special, only not the be afraid to work stacked rings.

It gave this at first. It curves by it self a bit. First try: very fine black thread, the Penny 40 I received from Edda as a sample. By the way, she is a great tatter and I simply love her tatting solutions.  

The white one is worked with Penny 30 and Range 40 and it curves slightly more, some adjustments might be necessary if you work with different threads than mine. I would do it to the SCMR  the upper part (instead of a 5-5 I would work 2-3 or 2-3).

The pattern I will give you now is for 2 shuttles (Sh1: white, Sh2: silver), two colours.
Start with R: 20, close, do not turn. This is will be the clasp support one.


Sh1: R: 10 – 10, close, do not turn. Let Sh1 hang behind the ring, switch shuttles.  


Sh2: 10 + 5 – 15, close do not turn work.


Prepare to work the “collar ring” with Sh2. Turn the work 90 deg. to the left. Wrap the thread around the work and work ring: 15. Bring carefuly the end of this ring around the work and close. Do not rush if you want a nice, even finish. The thread from Sh2 must be now back where the collar ring startet.


Flip work 90 deg. to the right. Start SCMR (white: active thread, silver core thread).
15 + 5 – 5.
Add the bead to the loop pass the shuttle through the loop, close SCMR. Turn work.
Please take care about the beads you will use, the sharp edged may cause some troubles. You can avoid them by chosing  fire treated beads or by adding fire treated rocailles before and after your bead.


Work chain: 20. You can also change this to 15 or a bit more.  Snug, turn work. You can see now the back side of the work


Take Sh1: work ring: 10 + 10. Do not turn. Work the first ring from this series.

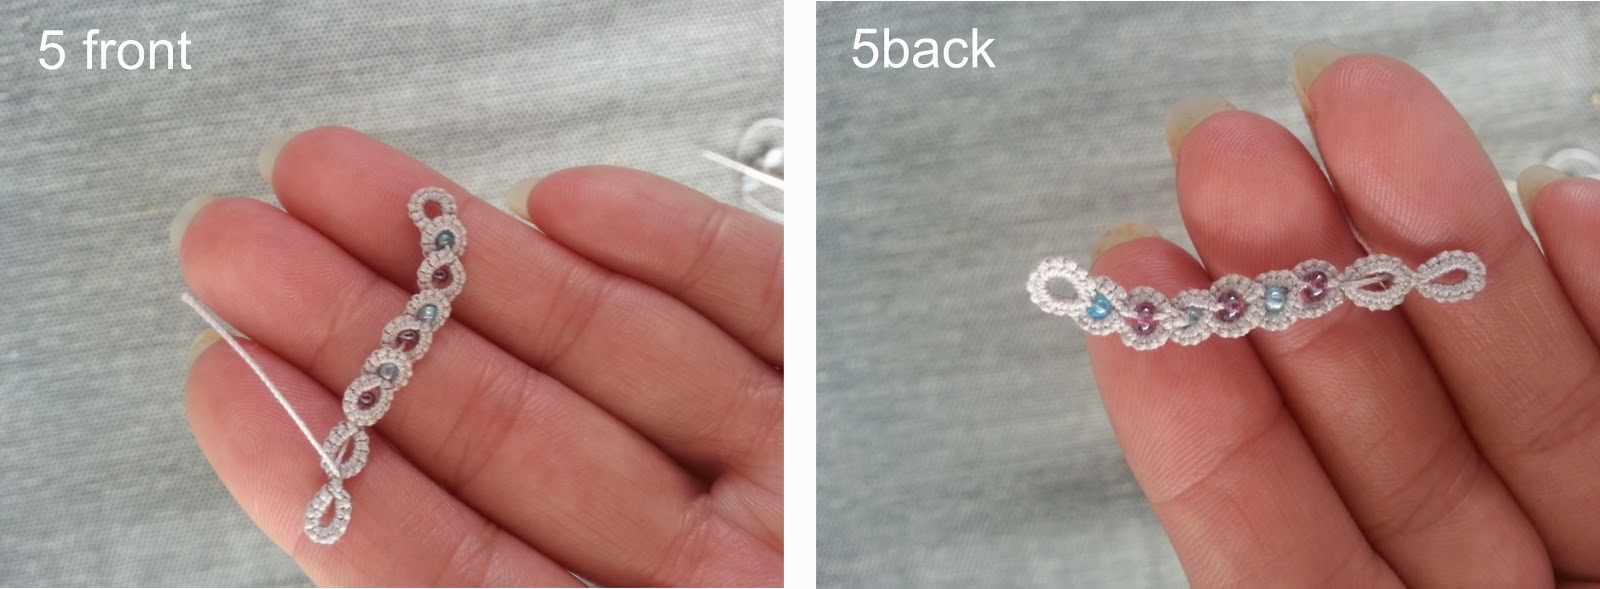
I kind of like this bow effect the rings create, worked with 2 colours it is more obvious. 
As I said, different threads and different beads, different effect. Play a bit with the pattern until you are happy with the result. 
I hope that I gave you a reason to grab the shuttles and that you will enjoy trying to work this pattern. 
Happy tatting. 


Sunday, September 6, 2015

Rosette with beads, funny beads

This is about the small black rosette I published some days ago... Love to tease you, love to make you find solutions. This helps a lot to get out a bit outside the box.

One box we are stuck in sometimes is the way to add the beads. They must come from the thread from the hand, from the shuttle or the needle or is has to stay on a picot. Really?? Not this time.
I tricked it. I am not the first one and there are more than 1 way to have this effect but the simpliest one, at least for me, will be described today.
This rosette has 2 rounds. The inner one as pretty easy.


Image
Steps and remarks
 
 What you need: 
Your thread. In my case, Penny 20 this time. 11.0 rocailles, a very fine crochet hook and a beading needle. Or any needle which allows you to pass 2 times through a 11.0 rocaille. 
String on the shuttle the beads you need. you must think: 8 beads for each petal. In my case, I needed 7 petals... 56 beads. Just put enough beads on the shuttle to be on the safe side. I was sure I will get a 6 petal flower... I had to unwind the shuttle and add the missing beads... 
Prepare to work the inner round. Take 11 beads on the hand and work ring. 


 Work 8 ds 4 bp 4 ds 3bp (2 from the hand, 1 from the shuttle) 4 ds 4bp 8 ds, close ring. 
4bp: 4 beads picot
3bp: 3 beads picot
Do not work these beaded picots too tight, you will want to have some thread for the next joins. 


 Petal 2 until 6: 
take 7 bead on the hand. 
Work 8ds join to the beaded picot by separating the beads (3 up, 1 down) 4 ds 3bp 4 ds 4bd 8 ds, close ring. 


 Intermediate phase. 


For the last petal taker only 3 beads on the hand. You will make the last join as a folded join. Do not let yourself impressed by the beads. 
Finished first round.  Cute enough actually like this. 


 We attack the second round now. I placed the small rocailles on top the the picots with 3 beads... This is where I want them to be. 
Therefore, I let my shuttle away and I use a needle. Remember? The needle  supposed to be able to pass through the 11.0 rocaille 2 times... But please keep in mind: the bead will have 1 thread in the hole... when you pass with the needle you will have in that little hole 1 time the diameter of the needle and 3 times the diameter of the thread. When I will explain how it will be done, you will see. 
Anyway, because of this simple math and some tests I had to use for this round Penny 30, a thinner thread. 
The needle will be used as a shuttle. 


 Thread the needle, let enough thread on the needle. It will be you core thread for the outer round. Don't make economy on it... you have some joins too. Do not cut the thread. You will work with the ball too. 
Take 1 bead, keep the rosette in place and bead and pass the needle through the 2 beads on top. 


 Now pass the needle back through the bead. Fasten.


 Done. Not hard, no science involved.
Now you can start to work the chain. Needle tatters will be disappointed: I am tatting with flipped ds. 


 I use for this the Riego tatting method. (Please correct me if I am wrong.) 

First movement / first hs
Wrap the thread on your left hand and prepare to work chain. 
Pass the thread from the neddle on the left side of the active thread (the ball) and bring the needle under the active thread as shown in the picture. Pick the needle, make the flip. 


 Second movement / second hs
Bring the needle from right to the left, pass it under the active thread. Make the flip. 
Congratulations: you just made a ds using a needle as a shuttle. 
Again: I did not invented it. I guess it was already done before me. 


 Easy peasy. I do not give you any ds count for the chain. It depends so much on your thread... My Penny 30 wanted 26 ds to lay flat... 
Take 1 bead, place it, continue... 


 Have fun. 


I hope this is not that difficult. It is actually fun and you will notice how wasy using the needle this way can be. The same movements I use also when I am finger tatting...
Let me know if you do  not understand some steps. I will try to answer as soon as possible.


Tuesday, July 1, 2014

Hello, Jaden!

Sone days ago, Jaden asked me if I can think about a way to still make the beaded chain (Nina Libin way, but with the beads on top of the rings. The chain itself appears in all antique tatting books. It is this simple rings chain with bare thread in the middle to climb to the next one. No genius fact in this one. The genious idea came from Nina Libin, to place a bead and the make the pulled join!
Tricky!
The chain by it self can be done with no problem, work ring that the bead fits in (some prior tests needed), close ring, place bead, make lock join or instead of making the join, pull a loop, start the new ring (make sure the the free part of the ring stays under, otherwise you will not be able to close this ring):
I also applied the same technique for the 2 pearls from the bottom of this necklace. This time I made the rings a bit smaller and placed the pearl on top of the lace. Pretty nice effect. 

I tried hard to make a combination between the beaded chain (with the collar) and the bead on top. Did not work. I tried to change the order of working the rings, to make all kind of joins, passed the shuttle in various ways, let it fall. It is not working. And you will see why.
I made a very quick tutorial for the beaded chain but with the bead between the rings. This is for you, Jaden, maybe the bracelet will turn out like you would like it.
Fill your shuttle and string the beads. I used baby blue seed beads between the rings, and purple ones in the rings. But you can also use 2 different sizes of beads, add beads on the chain...
Work a ring. Up to you how many ds. Bring the bead you want to place between the rings. 
As close as possible from the bead, work the next ring (with the vsp); this time your next bead has to fit in. 
Work the collar ring as big so the bead gets in it. Make sure you have the starting/closing point of this ring on the backside of the work. 
As you see, on the front side it will tend to "embrace" the bead, on the back side it will tend to stay on top of the bead. 
Make the join to fix the bead in place. 
Repeat the sequence for the desired lenght. 
The last non-beaded rings are my some of my tests to work the rings differently or to make another join. Why it will not work? look the back side: the purple bead gives a "lift" to the horizontal ring. If you try to change the sequence, it will not hapen or the appearence is not the same. 
Back to Jaden: 1 thing I did not test yet: work the collar, do not close the ring, prepare a join so the thread remains in the middle of this ring but on top of the ring of the chain, then carefully close the ring, finish the join and place the bead. Gave it shy try yesterday, got my fingers and nerves lost between thread, crochet hook, shuttle and fingers. 
Happy tatting. 
If someone smarter and more stubborn than me finds a solution to Jaden's riddle, may I know it too? Thank you!


Friday, April 4, 2014

Pattern for 1 beaded flower


I received some thread from Edda Guastalla and I had to test it. I was always in the search for the perfect thread for what I want to make. Coton is good, Lizbeth is acceptable (please, Lizbeth fans, do not be offended), my Brildor is perfect but the thread is so thin (120), that I have to make a strand of 3 or 4 to get a decent size to tat with.
Why polyester? Simple.
For jewelry with beads we’d better have a thread wich will not fray during the work, it has to be more resistent as the cotton because the beads can always damage the thread. Polyester can have a very good shine, it will not change colour in time, it is stiffer, the stitches are regular always and it is easier to wash.
On the other hand, I tat a loooot ANKARS style, so cotton is not the thead I need. From the thread from Edda I fell in love in the Penny one. I can do whatever I want, it will not fray, not loose consistency, it will not brake when I have to make and close large, monster size rings. And the colors are just spectacular.
Last days I posted the tests. 
This one, I really like, I made already the white pair, just have to finish it:


For the last one, the flower with the metallic thread I made the step by step instructions. Somenone wanted it. It is not an original motiv. It appeared in a Japanese book and you can find it in L’orina’s work (by the way, she tats a lot from these Japanese books). 


Difficulty: very easy, beginner
Material used:

Thread Range 30, brown
48 seed beads (size 15)
Shuttle and ball / 2 shuttles (I would advise, actually, for the daring ones, because of the Catherine Weel join)
Beads threader (sounds impressive, it is not)
Crochet hook
Good light.  Honestly, don't laugh, you need it.

Remarks:

1.       You can use any thread you wish, any beads you want, but you will need to adjust the ds for the outer chains. Just tat the chain until it curves a tiny bit on top of the beaded picot and make the join. This is the amount of ds you will use. Lees ds: the beads will refuse to lay, more ds, you will have an interesting clover effect (you can see it, I rushed with one of the petals). 
2.       I used a 4ds sequence for the ring, because I needed to make clear pictures. With this thread, a 3 ds base is perfect.

bp: beaded picot: 8 seed beads.
Prepare the material


String the seed beads, fill the shuttle. CTM.


Start ring with all the beads in the loop.


4  bp 4 p . Repeat this until you have the 6 beaded picots, finish with 4ds. Close ring, turn work.
Not difficult. 


Start chain. 11 ds join between the 4th and the 5th bead beads of the picot (in the middle) with the ball thread, make sure the shuttle thread stay in the center, so you can have a continuous core thread.
This would be the moment to make the Catherine Wheel join.  
Finish the chain: 11 ds. Make lock join (with the shuttle thread).


This should be the result.


I hope this is helpful. 
Have fun. It is actually fun to make a bunch of them and place them where you need them. 


Monday, September 23, 2013

10 minutes tat

I had to finish the thread on a shuttle, so I played.

Pattern for a simple pair of earrings
1 shuttle pattern.
Fun fact: you can stop after various phases and you will still have something interesting.
Not difficult at all, fast to be done and if you have a young pupil, it is perfect to give it to her during the class... She will not feel that she made the folded join or the lock join, promise! 
I choose to make these instructions like this, with pictures, I know it helped me a lot when I found something in this form. Honestly, I spent more time by taking the pictures and to process them than for the actual tatting. 


This is all you need. The bead has a large hole, large enough to let the chain pass through.
Secure the begining of the chain with a paper clip.
Start to tat the chain.
60 ds.
Of course you can change the amount of ds as you like, this part will hang anyway behind your bext element.

What you need now is to place the bead. Mine has 1,5mm hole, enough to be strung on the chain.
Remove the paper clip and string the pearl.

Make join lock to close the chain and to form it as a ring.

Now start the flower.
7-7-7-7 in my case. I have a very fine thread, so my flower vill have max. 2 cm diameter.
Without the picots for the upper ring now you have a small ring, or pendant, right?
I continued. Still you can stop at this point, you will still have something to make a finished object.
But I continued. Now this could be a pendant… Or with a pearl still an earring.
But I finished my flower. I wanted it a six petal one.
Why? You can fold it, see?
And if yo add a pearl in a ring, it is happy enough.


Small, simple things may bring a lot a satisfaction. Remember when you made the first flower? This is the feeling you will never loose. I don't know you, but after I finish the simpliest flower, I take a break to feel it in my hands. Dumm enough.

Back to the pattern topic. I wanted to start to make some. Mined field, I know. I have already submitted 2 of them in my Etsy shop. They are very simple.

One of them is a beaded rosette. The pattern is simple but in the instructions I put clear explanations (diagrammed ones) of the beads placement on the shuttle (for 1 and for 2 colors) and the possible variations. It can be a pendant or, with some variations, a nice beaded snowflake.

The second one, is a flower, an orchid. This time it has the visual pattern and the pictures of the different prases.

Have fun! And if you decide to give a try to this 10 minutes pattern, please let me know. I am curious to see all your ideas, you are all sooo creative!