Pages

Sunday, July 6, 2014

Dragonfly pattern

Now that the teacher in me knows that there is no step obmitted, I can post the pattern for the dragonfly.
Skills required: shuttle tatting, split rings, tatting with beads, optional.
It is a 2 shuttle project. The daring ones can also do it with 1 shuttle (Single Shuttle Spilt Ring).


Rough pattern:

R1: 12 ds.
R2: 8 / 8, cl, dnrw.
R3: 10/10, cl, dnrw. 
R4: 12 / 12, cl, dnrw. 
Sh. 1: R5: 25 - 15, cl, dnrw. 
Sh. 1: R6: 15 + 45, cl, rw. 
Sh. 2: R7: 25 - 15, cl, dnrw. 
Sh. 2: R8: 15 + 45, cl, dnrw. (or reverse, it is optional, but then choose the right shuttle)
Sh2: R9: 12 vlp 4 vlp 12, close, rw
Sh. 1: R10: 10 vsp 10, cl, rw. 
Sh. 2: R11: 10 + 10, close, cut, hide ends. 

Of course you can vary the ds to suit your thread. I worked it with something similar to the Lizbeth 40, so it is not too big. If you work with cotton, then you should definitelly re-think according to the maximim of the ds you can make for a ring. Or you trick it nicelly ad work chain, but for this, re-thinking of the beads sequence is necessary. 

Beaded variant: 


For this one, I strung on the shuttle 1 the beads for the antenae (as in this previous blog entry). 
Start stringing the beads: Shuttle 1: the 2 feeles then 11 beads , Shuttle 2: 11 beads. 
The result: 

In this case it is very important to work R9 with the Shuttle 1. 

For the purple variant: 


String the beads for Shuttle 1: the feelers + 24 beads, Shuttle 2: 10 beads. 
Between the split rings, you add the beads as described in the previous blog entry.

bs: bead brought from the shuttle (stays on the core thread)
bp: beaded picot

R1 (with 2 beads in the loop) 3ds bs 3ds bp 3ds bs 3ds close ring. 
R2: as described... 
R10: 3ds 7 bs sep by 2 ds, 3 ds close ring. 

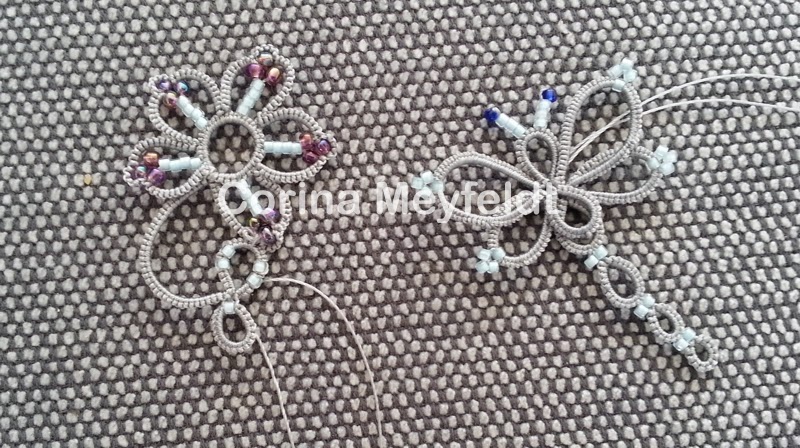
Adding the beads, cristals is entirely up to you. My dragonfly will end up as a brooch. 


I have to thank Marisa di Mauro, she tatted the dragonfly only from the rough pattern, without having the ds given. Here is her variant. 
Happy tatting. 


Bits of technique: split rings with beads in between (diamond shape)

I am normally not too much into the theory, but because I want to post here a pattern (the dragofly), I really need to make this intermezzo.
Remember this set?
The middle part is just rings with the pearl ont he thread. This is not interesting me now. What I need are those split rings with the beads disposed as diamond in between. 
Long story short: it is a 2 shuttle project, CTM is perfect. You have to string beads on both the shuttles. Shuttle 1 will have, as a proportion, 3 times more beads as Shuttle 2. All the ds given are just for the sake of the demonstration. In the diagramms the beads have 2 different colours just to show from which of the shuttles are coming the beads. 

Shuttle1 : start ring with 1 bead in the loop: 16 close. The bead will stay on the core thread at the closing point of the ring. 


Shuttle 1: take 3 beads. 1 bead will come next to the ring, make loop with the other 2, work the first half of the SR (8ds). Lower 1 bead from the loop at the base of the ring, keep it in place. Take Shuttle 2, bring from this shuttle 1 bead at the ring, start the second half of the ring (8 ds). You should see the diamond formed. Close ring. The remaining bead from the loop will be the base of the next diamond. 


I needed to make this small tutorial for the tail of the dragonfly. Otherwise, that blog entry would have been a monster one. 
Have fun tatting. I know you will. 


Tuesday, July 1, 2014

Small flower, another way to add beads?

This was my intented post today. Got lost because of this chain I promissed to try/do/test.
A small flower, more like a violet, but this is just because of the colors.

Get your material toghether: thread (Tenax 30 /Lizbeth 40) , 1 shuttle and 1 ball (CTM), 35 seed beads (I used 11 Toho delicas). This time you will really need a beads threader or something appropriate (this tiny wire foldet in half is just perfect). A crochet hook will not be enough, trust me.
Pattern? the most boring ever: inner ring and then, round 2, all chains.
For a 5 petals flower you must string the seed beads to make the 5 centers for the petals.

1. String 4 seed beads

2. Take 3 more beads

3. Pass the threader through the previous beads so the last 3 becomes a picot. 

4. Snug. It shoud look like this.

5. Repeat 5 times. 

6. Work the inner ring with these beads in the loop (you will use them as beaded picots, marked B): 3 B 3 - 3... repeat until you have used all the beaded "stems", finish with 3 ds, snug, close ring. 

If you must move the beads, do not worry, just hold the bead on top and move it in the direction you need. You will be surprised how easy they are to move. 

7. Start chain, you will use only lock joins: 12 + 7 + 12 +- Feel free to adjust them to fit your thread and beads. 

8. Cut and hide the ends. Mine are not yet done. 

This little flower will get some sisters and will end up on a bracelet. But with some planning, it can give a delicate pair of earrings, a necklace.  You can also play with the colours for the beads: 


Notice the feelers? They are done with the same method. 
Happy tatting, have fun!

Hello, Jaden!

Sone days ago, Jaden asked me if I can think about a way to still make the beaded chain (Nina Libin way, but with the beads on top of the rings. The chain itself appears in all antique tatting books. It is this simple rings chain with bare thread in the middle to climb to the next one. No genius fact in this one. The genious idea came from Nina Libin, to place a bead and the make the pulled join!
Tricky!
The chain by it self can be done with no problem, work ring that the bead fits in (some prior tests needed), close ring, place bead, make lock join or instead of making the join, pull a loop, start the new ring (make sure the the free part of the ring stays under, otherwise you will not be able to close this ring):
I also applied the same technique for the 2 pearls from the bottom of this necklace. This time I made the rings a bit smaller and placed the pearl on top of the lace. Pretty nice effect. 

I tried hard to make a combination between the beaded chain (with the collar) and the bead on top. Did not work. I tried to change the order of working the rings, to make all kind of joins, passed the shuttle in various ways, let it fall. It is not working. And you will see why.
I made a very quick tutorial for the beaded chain but with the bead between the rings. This is for you, Jaden, maybe the bracelet will turn out like you would like it.
Fill your shuttle and string the beads. I used baby blue seed beads between the rings, and purple ones in the rings. But you can also use 2 different sizes of beads, add beads on the chain...
Work a ring. Up to you how many ds. Bring the bead you want to place between the rings. 
As close as possible from the bead, work the next ring (with the vsp); this time your next bead has to fit in. 
Work the collar ring as big so the bead gets in it. Make sure you have the starting/closing point of this ring on the backside of the work. 
As you see, on the front side it will tend to "embrace" the bead, on the back side it will tend to stay on top of the bead. 
Make the join to fix the bead in place. 
Repeat the sequence for the desired lenght. 
The last non-beaded rings are my some of my tests to work the rings differently or to make another join. Why it will not work? look the back side: the purple bead gives a "lift" to the horizontal ring. If you try to change the sequence, it will not hapen or the appearence is not the same. 
Back to Jaden: 1 thing I did not test yet: work the collar, do not close the ring, prepare a join so the thread remains in the middle of this ring but on top of the ring of the chain, then carefully close the ring, finish the join and place the bead. Gave it shy try yesterday, got my fingers and nerves lost between thread, crochet hook, shuttle and fingers. 
Happy tatting. 
If someone smarter and more stubborn than me finds a solution to Jaden's riddle, may I know it too? Thank you!


Wednesday, June 11, 2014

Beaded chain, Nina's Libin method

I empty my shuttles and play, or learn, or test while I am doing it.
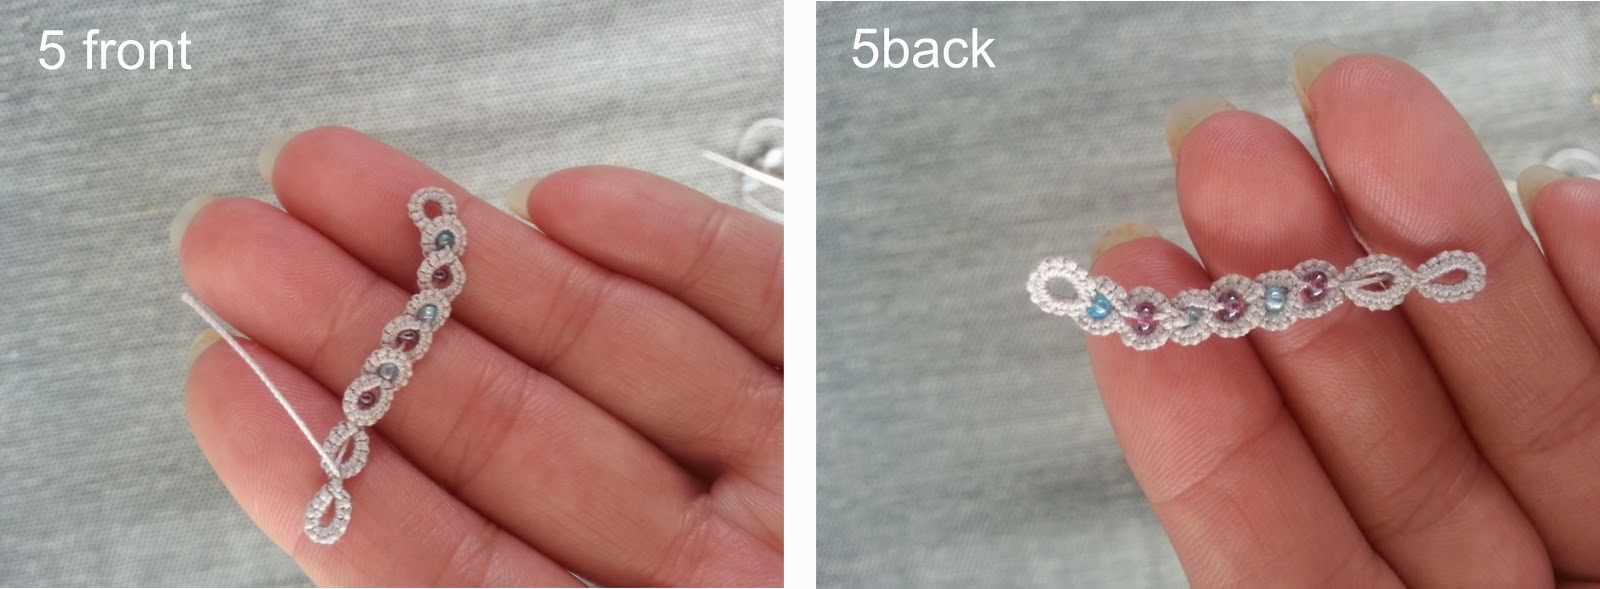
This time I had some beads on the shuttle, so I fooled around with some rings and beads. I used Nina's Libin method: tat the ring normally and then climb on top of the ring with the bead which will stay in the ring. So smart and simple. What I added was this little "collar". It ended up to be a nice chain or braid and I intend to use it as the middle part of a bracelet.


How I did it:


Starting point.


Work ring


Turn work that you have the starting end of the chain to your right, wrap the thread to make a ring.


Work the ring and close it. Do not rush, you want it to close nicely, on the back side of the chain.


Bring 1 bead from the shuttle and place it in the ring.


Make lock join to fix the bead in place.

Of course, I could not resist, and I made a variant, by bringing another bead between the rings: 
After the lock join, bring one bead, make the next ring. Turn work, make "collar ring", close, bring the bead to place it in the ring. 


I worked this with Lizbeth 20, my beads were 1,5 mm. I used for the normal ring: 4 - 4 vsp 4 - 4, and for the collar ring: 12 ds. 
For the variant, the collar ring had 14 ds, so it lays flat. 

Remarks: 

1. Do not rush! The horizontal rings are a bit stuborn to close. The closing point has to be always on the back side of the work. You cannot trick it, it does not have a nice appearence. 
2. Choose, if possible, beads with a bit larger hole to place between the rings (for this variant). The lock join knot will be hidden by the hole and the chain has more stability. 
3. Make a test before, so you can know how many ds you will have to use. 
4. Careful when you start any new ring. No thread should be left visible. 


When I make my lock join I use a small trick, like this I do not have any surprise and I do not have any bare thread by accident. I pull the thread like for the Catherine Wheel join but I do not let it pass to the other side. I snug this loop by pulling the shuttle thread in my direction (holding the thread under my left thumb). Like this the knot is very tiny and even. I do not know if this was done before, but it works for me. 

I hope you will give it also a try, just tell me how it turned out. 
Happy tatting. 

Tuesday, June 10, 2014

"Bracelet searches for a nice wrist"

We learn. With every single thing that we see, or test. I had a lot to learn these past 3 months, not only tatting related.
But my tatting did not make any break.
I revisited some old patterns: my Reina bracelet, the choker Perla and the wrist watch.


Tatting bugs was a first for me. Believe or not, I did not really tat any butterfly until this contest from ALittleMarket.com
The theme: the dragonfly. After some browsing (how could I know it I am not stepping on someone's other path?) I made my own. Ankars style.

All done with polyester thread, the green facetted cristals beads are Bohemian ones, the dark red: agat. 
3 elements bracelet: the foundation: a common square motiv. The red flower: own pattern (1 shuttle flower, nothing interwoven, so no real pain to work every ring). 
And the dragonfly ended up quite decent. Ankars style means no bead added during the work. Everything is sewed after. 
The real test came after. I do not tat with a pattern in front of me, this makes the things not always easy. I never learn. 
I managed to work today again the dragonfly (as you see, 2 shuttle thing). I added some more vsp (for more stability) and, this time, the feelers are tatted in!
I made the pattern, tested it, made the ones with the beads schemes too (all the beads go on the shuttles).  I will post the pattern after I will let it be tested. 
But I feel happy about these feelers. I checked this way to add the beads for a small flower. It is really working fine. Guess it is something worth some more attention for 1 pattern or 2. 
Go back now to my testing.
Happy tatting.

Monday, May 19, 2014

Pattern "Hearts"

I had a nice chat with an Italian tatter. She wanted to know if I have an idea about an infinity symbol pattern. I googled (of course), found some... not so my taste. But while searching, I found this drawing:


First verdict: I like it! Second verdict: I can tat that! Fact: did it!
Did various tests:
From left to right: 
- 1 shuttle and some thread (as for a ball), Lizbeth 40;
- 2 shuttles and 2 colour, also Lizbeth 40 (Charcoal and Jewel);
- 3 shuttles, polyester thread, rests of shuttles. 

I ended up by doing the pattern for this one: 
Finca thread , 12 size, green and dark red (not a first choice for tatting, but good enough to waste it in tests).
2 shuttles. 

If working dimpled rings is not for beginners, than this is a pattern for intermediate skilled tatters. But cute enough to motivate to learn the dimpled rings, I think. 


Fill the shuttles with a decent amount of thread. 
Shuttle 1 (black) tat ring: 30 ds, close (you can do it smaller if you want... it is anyway the ring for the clasps). 
Rotate work and take shuttle 2 (Red). 
Work dimpled ring: 10 - 3 (working loop) 3 + 10. After 10 - 3 you let a big loop from the core thread (so you can form nicelly the heart), work 3 ds, make join, 10 ds, close carefully. For reference: here (for Sue Hanson's way). Addendum: Ninetta sent me her tutorial for the dimpled rings. Amazing how this thing looks easy with her hands! And funny title for her blog entry: "Hearts can hurt"
Do not turn work. 
Start chain (black for the chain, red for the core thread): 20 - 5, make lock join. (preferably take the whole picot from the heart and not in between the threads). 
Turn work, start chain: 20 ds. 
Switch the position of the shuttles using SLT. 
Turn work, with shuttle 1 (black) work ring : 20 + 20, close, rotate work. 
With shuttle 2 (red) work dimpled ring. 
Repeat for the desired length. 
Variations: if you add beads for the shuttle for the hearts, you can use them by sliding them in the core thread loop at the middle of the dimpled ring, see the second test. 

If you want to play a bit more, add more beads on the shuttles, you just have to plan them a bit better.
For this one, the beaded section of the chain is worked: 5 bp 3 dp 3 bp 5 (bp = beaded picot, dp = diamond beaded picot). 


Donn't get stuck with my count of ds, change them so they fit to your thread. There is always a little surprise around the corner when a pattern is worked with different threads. 

Have fun. For questions, I am always somehow here.