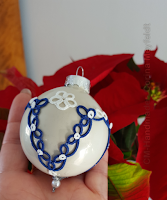
It is not dificult to do... except you want to do it the way I did it: with 3 shuttles and using padding tatting.
The pattern is just rings and chains and at the first glance, one can say: 1 shuttle and a ball, 2 different colours would do it. But if you search for neat work, no knots to change directions and smooth finish, then I would still chose the 3 shuttles solution. Trust me, I have tried the easy way, I was not happy with the result: the elements were twisting and the lace did not bend but just fold at the point where the knot was done. This is, by the way, what I disliked with needle tatting: pictures are nice, but the actual lace not that much.
Why 2 shuttles and the ball would not do it? Because you will want to have the possibility to switch 2 shuttles with green thread without making knots or "jumps" between the upper and the lower side of the ds. Which will lead to a not nice finish.
Why padding? Well the same reason. See that lower red ring? With 2 shuttles you cannot make it look really nice. And by padding, you can nicely hide that red thread and use it only when you want it. Happy GR8 owners....
So 3 shuttles for me. Padding. For the ones needing to refresh the technique you can refer to the video of Karen Cabrera here or to a tutorial from Georgia Seitz. Both perfect to learn this technique.
All the chains have 20 ds, and are done with padding, no turn work.
You will use the upper green shuttle for the rings and the lower green shuttle for the padding.
Prepare the 3 stars. Mine were 5-5-5-5 or 5 -10 - 5 for the petals with no joins.
Make with the red thread a 10 ds ring. Snug, and keep it.
Pattern:
Green shuttle:
R1: 10 - 5 - 5
R2: 5 + 8 + (to 1 red star) 8 - 5.
R3: 5 + 5 - 10.
Do not turn
Place at the base of the trefoil the small red ring (R4) and prepare for padding. Hold both threads together. Make 20 unflipped ds. Snug well, you can also pull a bit the thread thread.
Red shuttle: R5: 10 ds. Close ring. Do not turn work.
Upper green shuttle: R6 10 + 8 - 2 close.
R7: 2 + 8 - 10 close.
Lower green shuttle: padded chain 20 ds. Snug well.
Red shuttle: R8: 10 ds.
Upper green shuttle: R9: 10 + 8 - 2.
R10: 2 + 8 - 10. Do not turn work.
Chain 20 ds. padded.
Upper green shuttle: R11: 9 + - 2- 9. Turn work.
Red shuttle: R12: 10 - 10. Turn work, prepare for padding.
Chain: 20 ds.
Repeat to get to the upper trefoil.
Work trefoil and join to the star.
Do not turn work. Chain padding: 20 ds. Shug, turn work.
Red shuttle: R13: 8 + 5 - 3. Do not turn work.
Red shuttle: R14: 3 + 5 - 8. Turn work.
Chain, padding 20 ds. Repeat 2 more times.
Join the last eement to the first one.
Cut and hide ends.
Now you can finish your baubles as you like. I made them this way:
They are not that bad and all the trouble with the 3 shuttles is really worth doing.
If you get inspired to work them and if you get stuck, just give me sign.
If you find an easier way to do it, please let me know.
Needle tatters could trick the encapsulating by using 2 threads in the needle... and then switch the needle from 1 thread to the other. Sorry, hard to find a decent equivalent for a 3 shuttle pattern to be worked with the needle. Of course, you can ease your life and give up the 2 colours and use 2 shuttles and red beads instead...
Have fun.


Absolutely Gorgeous !!! Love the little red berries - perfect ! You always come up with such beautiful patterns - thanks for sharing :-)
ReplyDeleteThank you, muskaan. Have fun with it. I know you can try to imagine an easier way with the same finish for the thread change.
DeleteBeautiful! This is going on my Christmas tatting list!
ReplyDeleteEager to see your variant, Diane!
DeleteLovely! Yes, it's worth working with 3 shuttles to get a neat effect. Thanks for the pattern.
ReplyDeleteThank you, Jane, for passing by. ;)
DeleteSaludos Corina leyendo la introducción a tu perfil me he identificado plenamente ya que el frivolité me ha atrapado ya hace unos años (más de 10) cuando lo aprendí sola con unos videos de youtube, ahora ya encontré una asociación de frivoliteras acá donde vivo al sur de Suecia y una vez al mes cuando convocan voy a divertirme unas horas intercambiando ideas y nuevos patrones. Durante estos días no logro dejar unos minutos las navetas y en los que haceres de casa los dejo de lado :) en fin es nuestra pasión y agradezco lo que nos compartes. Abrazos y felicidades.
ReplyDeleteUn placer conocerte, Isa. Para mi no se pasa ningun dia son mis navetas. Antes, publicaba más que lo que hago, ahora no me da tiempo en prepararlo bien (sacar fotos decentes, hacer las esquemas... ) Pero no dejo del lado mis hilos y navetas.
Deletemultumesc :)
ReplyDeletegrazie per il tutorial
ReplyDeleteVery beautiful ornaments!! :)
ReplyDeleteBeautiful pattern and lovely Christmas ornaments
ReplyDeleteTa boule de Noël est vraiment splendide ! Merci beaucoup pour ce cadeau très généreux.
ReplyDeleteComplimenti, sono bellissime!
ReplyDelete