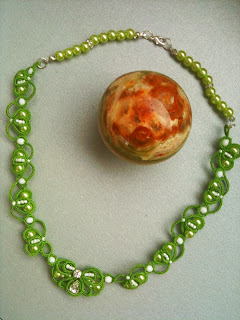
But I tried to make the pattern for the lateral sides of this green necklace:
This necklace has 3 tatted parts: the lateral ones, they are the same, the central one (it will come in a next post), the pearls strand and the clasps.
It is a 2 shuttle pattern. I used a 120 tiny thread, strand of 3, this allowed me to use the pearls I had available around (white facetted oval Bohemian cristals, 4 mm green acryl pearls, the 11 size seed beads). Also the ring on ring knowledge is required and you should be able to work it from both sides (right and wrong side).
I would suggest to use a fine thread or, at least, to make a test before you start the real thing. Like this you will have an idea about the finished size of the chain and the beads you will need.
Fill the shuttles with a decent amount of thread. The ring on ring requires it. String on each shuttle as much seed beads as the amount of bigger elements you will have for your chain. Actually you need half of it on each shuttle, but better save than sorry.
Start ring: 18 - 6 close, turn work.
Chain: 16 ds, turn work
Start ring: 16 + 16 - 16, close, do not turn work.
Start ring: 16 + 16 close, do not turn work. Make sure that this ring lays below the bigger ring you worked before.
Start ring: 16 + 16 - 16, close, turn work. Make sure this ring is in top of your smaller ring, the same level as the previous bigger ring.
Bring one seed bead from the second shuttle. This makes a nicer transition and hides the thread.
Start chain: 16 ds.
Split ring: 6 + 6 /6 - 6, close, do not turn work.
Chain 16 ds, turn work.
Now you will have to work the next bigger element. This time, you must make sure that the smaller rings (the 16 - 16 from the middle) are at the same side as for the previous element. For this, you will have to make the joins from below. Place the thread on the left side of the work, pass the crochet hook from bottom through the picots, take the thread and pass the shuttle in the loop from the upper side. I think I have somewhere a picture about it in a previous post.
This part should look like this:
When the desired lenght is reached, comes the assembly and the sewing the pearls part.
This was what I used, the small lines indicate how I sewed the pearls. To prevent that the sharp edges of the beads cut the thread, you can always use seed beads near the lace.
About the beads... You have 2 possiblities: you have them already, then you must make some thread tests before. Or you just tat the lace and then buy the beads.
You have a lot of freedom. This is nice part of Ankars. One takes a pattern and, depending of your beads choice, this same pattern mutates every single time.
Please let me know if there is something you cannot follow and tell me if there is something to correct. I am always here to help, if I can.


grazie
ReplyDeleteYou are welcome, Daniela. Good luck in making this part of the necklace.
DeleteOh super, ce collier est magnifique ! Je ne suis pas sûre d'y arriver par la technique Ankars, plus précisément en utilisant du fil polyester. Ce fil est plus difficile à travailler que le coton, enfin pour moi. Essais peu concluants...
ReplyDeleteTon collier me donne envie de refaire un essai. Merci pour le partage :) :)
Biensûr tu peux le faire. Il n'est pas tellement difficile. Au moins un bracelet en sortira, j'en suis sûre.
DeleteAvec du coton oui peut-être mais pas avec du fil polyester... fermer les rings avec ce fil... une catastrophe !!!!
ReplyDeleteEnvoie-moi une photo du fil que tu as. Il devrait briller, autrement tu ne peux fermer aucun ring...
Deletemerci pour ton aide Corina. Je t'ai envoyé la photo par mail :)
DeleteE' bellissima! I'am a beginner of tatting but... I have to try!
ReplyDeleteThanks for the pattern!
let
Have fun with this pattern, Let.
DeleteMille fois merci Corina pour ton généreux partage. Pour l'instant j'ai un peu repris mes perles, mais je reviendrai très vite à la frivolité;
ReplyDeleteBisou
Titine
Vu tes récentes BO, on t'excuse pour la petite trahision! ;)
DeleteThat necklace is absolutely gorgeous!!! :)
ReplyDeleteThank you. Please, let me know if you encounter some problems in following the pattern. This, IF you decide to make it.
ReplyDeleteBellissima creazione...ciao.
ReplyDeleteGrazie, Gloria.
ReplyDeletewow... i love it, especially the light green is gorgeous :)
ReplyDeleteThank you, Ewa.
DeleteBellissima complimenti
ReplyDeleteBellissima complimenti
ReplyDelete