Pages

Thursday, July 16, 2015

Small earring

Remember this one?

Bracelet

I played with the idea and the last one I uploaded. The basic idea is the same: 1 shuttle, all the beads strung previously. And with a crochet hook and some decorating beads, this is all you need.
Remember the small rings? You take 1 bead in the loop before you start the ring, work the ring and close it. The bead will remain on the core thread, at the base of the ring. If you are needle tatting, just work the ring and before you close it, take 1 bead and then close the ring. 

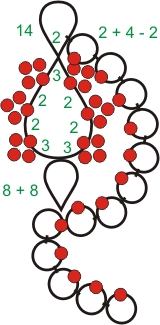
The left diagramm indicates the order of the work, the right one: the ds. Please note that you can adjust at any moment the double stitches and the small rings according to the thread, beads you use. You will feel it while you work it. 
I used a Brildor PB15 thread, a thin polyester (like an 80 size thread) blended with gold metallic Finca thread. 

1: R: 2 - 14, close, do not turn work. 
2: R: 3 dbp 2 dbp 2 dbp 3 - 3 dbp 2 dbp 2 dbp 3, close, turn work.
3: R (with 1 bead in the loop): 2 + 4 - 2, close ring, do not turn work. Repeat how many times you want, until you have a chain you like around the larger ring. Keep in mind that you must have space to work the 4th ring underneath the larger ring. In my case: 8 times. After the last small ring: turn work. 
4: R 2 - 6 + 8, close, turn work. 
5: R: 2 + (the the previous ring) 4 - 2, close ring. Make lock join to the picot from the previous small ring. Continue without turning work for as manny small rings as you wish. Last small ring will be a 2 - 6 one (no picot needed anymore). 
Now you can add the desired beads, by sewing them. 
Small remarks: 
- Do not rush when closing the small rings. It is not always easy to close them all the same. 
- Make the joining picots as small as possible. 
- While sewing the beads, use a fine needle and pass through the beads of the small rings. This will give more stability and stiffness to those chain-like elements.  Especially the longer one may need it. Pass through the bead, hide the thread between the ds, pass through the next bead. It takes time, but it is worth to do it. 

Have fun! 


Saturday, April 11, 2015

Long time not here

I have been absent for too long. I miss my tatting, since I cannot do it like I am used to do it. Lack of time. My tatting is reduced now to 2 to 3 hours. Much to little for all I have in mind to do. A lot of projects wait in the line. A final touch here, a "check this idea" there, At least 3 patterns are on the way. Still.
I finished some of the pieces I started. I will post some of the patterns here, as promissed.
I finished today a bracelet. I will offer the pattern, more the way to do it, it is not difficult.

Central part: separate elements. 1 shuttle only. 
r: 10 - 10, close, do not turn.
R:  10 +  8 - 8 - 10, close, do not turn.
r: 10 + 10, close, do not turn.
Rr: 10 + 10 - 10.
Repeat until you have a square element done.

Work so many of those elements until you get the desired length. 6 of them in my case.

Outer round. 1 shuttle and 1 ball. 
Prepare the shuttle with the necessary seed beads for the rings. As you can see, 8 seed beads between 2 of the squared motifs. All those get on the shuttle. I placed also 16 seed beads on the ball (in this case add 8 extra beads on the shuttle). I wanted to have a double chain o the ends, better finish for adding the clasps.
Start from the point indicated in the image.
R( with 4 seed beads in the loop): 15 + 10 bp 5, close, do not turn work.
R: 5 + (separating the beads1 down, 3 up) 10 + (to the next element) 15, close, turn work.
Chain: 20. lock join to the next element.
Chain: 20 snug, turn work.
Repeat until you reach the end of the elements.
Have a look of the finished bracelet:
We work now the ending. After you have worked the 20 ds, make lock join.
Work chain: 25, make lock join. Do not turn work.
Work chain (with 4 beads ready): 3 bp (1 from hand, 1 from shuttle) 3 bp 3 bp 3 bp 3 snug, lock join to the next joining point of the element.
Work chain: 25, lock join to the picot from the other side.
Continue working the other side of the outer round.

The rest is up to you.
Feel free to change the ds for the outer round. My bracelet gos a nice, concave (or convexe) shape. And because of the Penny 30, the lace is fine and very stiff.
Ennoying fact: so many ends to hide!!! You can, of course, use the magic trick, but since you will want maybe to place a bead in the middle of the elements, better not. Personal choice, in fact.
Have fun tatting.


Thursday, January 29, 2015

A matter of sharing

Internet is a jungle with own rules. Sometimes this is depository of a huge amount of information. 80% of the users use it to find relevant information for them. Some others use it also to exchange information. We all searched for something, we found the info, we used it, moved on. Only later comes the habit to apreciate the source of information we found/received. And very late, sometimes too late or never, comes the good habit to organize this information, to put some order in this search quest.
I am new in this world of the crafters. I tat only since 2 years. I learned alone, with my nose glued on the screen, I swalowed my frustration in front of the monitor and continued to search for help. Yes. I used Internet for this. I have been in all the places, learned from all what I could. And I am thankful for what I found and for the help I got. I grew up, learning from a lot of good tatters.
Now I can help a bit the others sometimes. I share what I know always when this is necessary. And SHARING is actually the keyword.
I am educated never to touch something which does not belong to me. This is called robery in my country. I learned that it is true that my freedom stops when the freedom of the other ones is menaced by my acts. As a philologist I learned that, when you use the ideas of someone else, you MUST quote, otherwise your entire work is called plagiarism. Another word for robery. The intelectual level. Cruelly punished. There is no glory coming by imitating.

Now comes the "sharing" principle. I can share or offer something what I possess, something which is mine. I cannot just come into your house, pick up something I like and then offer it to my best friend, only because I want to be nice and to keep this good friend. Is it a good friend this one asking me to steal for him/her? an other issue here. Only because we interract through bits ans bytes does not make us less real.

Ask anyone and they would say the same: Me, steal? Never.
Why this answer comes so quickly for a physical object and not for an idea, it beats me. Maybe only because the first one is associated with police and trials? The fear of getting punished is bigger?

Please, when you "share" a pattern please reflect: is it really sharing? Does it belong to you?

When you "share" a document, a scanned book, take a second or two and think: does it harm someones rights?

When you "share" your knowledge and copy a pattern from a picture and then "share" the picture with the instructions to work it, step back: is this sharing?

Pinterest, Facebook, Instagram, you name them, are full of images. Mostly are there illegal: not the author placed them there. Please, do not keep this bad habit alive. Some of the designers/photographers try to make a living from their skills. "Sharing" their work kills their chances to succeed.

Don't hide behind "I did not know", "I am new", "I just found it"... it is lame. Ignorance is never an excuse. When the picture has a watermark, a name on it, a blog, just follow, take your time and follow the source and contact the author. So simple.

When you notice that a picture is scanned (one can see this easily), that it is part of a book (yes, the page numbers are always a good sign), do not re-pin or re-share it. You become accomplice.

I did the same, I have a Pinterest account too. I stopped using it. I would not just delete the collections I have there and I must take my time to remove all the pages I know they should not be there. But I do not have the time yet. I just use the "Ideas to tat" collection.

Again sharing. I share in this blog what I know. I share patterns and I always answer any question. It might be that I want I keep some of my ideas for my own use, they will become patterns to sell. My right.

Tuesday, January 20, 2015

Beads and tools

This entry will not be so impressive, but it might be helpful.
It is about beads tatted withing the lace and the tools you need. For the ones already familiar with the tatting with beads, sorry, no new territory. But, if you have some more hints, please share them with the newbies.
These would be beads you might consider to tat at the same time as the lace. Again, sky is the limit, it is just to get an idea.


No, no bead in the middle of a ring, no big bead tatted in Ankars. Except the ones used already as a joining element. But it is safer te work the elements separatelly and to join them while decorating the foundation than hanging a heavy bead. Ankars tatting is about beauty, perfection as it can be and resistance at the same time, the tatting skills stay more with the technique to create a perfect base for the beads than to incorporate the beads into the lace.
Recommendation: the smaller the beads the better. Preferably: even beads, especially when included on the core thread. This is changing the proportion little by little. For 3 rocailles 11.0 you will change the dimension of a ring by 3 mm. Funny. This brings us always some frustration while adapting an existing pattern.
Small bead = tiny hole. A truism which can really hurt. 11.0 Miuki has a hole of 0,8 mm, A 15.0 has a 0,7 mm hole. This is huge! And this can create problems to work with the beads, to string them on the thread. Not to speak about the choice of the thread.
Normally, I  use what you can see here. Forgot the place a paperclip. Important that one too.
Beading needles. Not only to sew the beads on the lace, but also to string the beads. And yes, a 10 size beading needle can be used with a thread similar to the Lizbeth 40. I did it. Never forget when choosing the beads and the thread: when you use a needle, a beating tool, a threader, you will always have a strand of 2 when you string your beads.
How to skip it: apply glue to harden the end of thread and try to use it. Not my favorite choice, though.

My "tool". Done from broken guitar string. My son knows already: I receive all his broken strings.
I prefer an open end to the ready-to-buy variant. A lot more versatile.
How to make it? Take some 10 cm of a tiny wire, (from electrical cable, from craft copper wire, the 0,3 is perfect, a fishing wire), fold it 2. Done.
For what it serves? To string the beads, to place the beads on the picots, to make difficult joins, to place beads/elements the fine crochet hook cannot place.


Crochet hook. We know it. The finer, the better.
Perfect tool to string individual beads, to place beads on the picots.
Why finer? Not only because the holes are under 1 mm but also because sometimes the joins can be done in between the beads:
In these cases I tend to use my tool. 
Limits: cases like this one: 


 So you turn to the cheap wire tool: place it on the thread, place the bead, fix the paper clip.
 
 
The smart ones will make very long (gauged) picots. Viable solution when you work with regular beads. What about the irregular beads?
See the last picture? it is what comes next int he blog: placing the seed beads and using them not only as decorative elements.


Tuesday, January 13, 2015

Simple ROR earrings

Those ones were waiting to get a how to tat history... And since I would not like to tempt some tatters to try to estimate, I just rushed a bit with the pattern. Which I promissed anyway.


Skills required: shuttle tatting, tatting with beads, up and down joins. 

Small reminder for the ones liking a neat finish, no twisted picots. Never fight against the thread. This always can punish sooner or later. Better learn the right technique than making compromises to the quality of your lace. Not even when worked "for fun". Yes, I've been told this one too: "We do not work at an academic level, just for fun."
· Up join - marked with + in the pattern (the regular one, the one we learn at the beginning) will make that the ring you are working lay under the rings already worked. Reason: the thread you pull from the left hand to make the joining loop brings the worked ds from underneath the work. You will pass the shuttle also from down towards up.  
· Down join - marked with * in the written pattern: when you pull the thread to make the join, the worked ds are on top of the previous rings anyway and the shuttle passes from left to right ON TOP of the work, so this ring will remain on top. 
That  simple. 

There you go for the pattern. 
1 shuttle project. 
Material needed: thread of your choice (my Penny 30 gave me a 2,5 cm long earring), 28 seed beads (29 for the daring variant, with the tatted in crystal). Beads of your choice for the finish. 

Shuttle, beading threader, fine crochet hook, scrissors, needle (for the finish). Magic thread trick is beautiful, but maybe you would like to place 1 bead and then hide the thread. 
All the picots will be very small picots.

Basic pattern: 

8 rings worked in the given order. 
R1: 5 - 5 - 10, cl, dnt
R2: 10 + (to R1)  20 - 10, cl, dnt
R3: 10 + (to R2) 5 - 5, cl, dnt
R4: 5 + (to R3) 10 - 5, cl, dnt
R5: 5 + (to R4) 5 - 10, cl, dnt
R6: 10 + (to R5) 15  - 10, cl, dnt
R7: 10 * (up join to R6) 5 - 5, cl, dnt
R8: 5 + 10 + (folded join to R7) 5 cl, cut thread. 

The beaded variant requires the use of the beads. Known already: 3 beads in the loop for the ring, 1 from  the shuttle to form this diamond (marked dbp in the pattern).  All rings will start with those 3 beads in the left hand, except the ring 6. Feel free to change it if you prefer it. 
String on the shuttle 28 beads. 

R1: 5 - 5 dbd  1 - 11, cl, dnt
R2: 11 + (to R1) 10 dbp 10 - 11, cl, dnt
R3: 11 + (to R2) 1 dbp 5 - 5, cl, dnt
R4: 5 + (to R3) 5 dbp 5 - 5, cl, dnt
R5: 5 + (to R4) 5 dbp 1 - 11, cl, dnt
R6: 11 + (to R5) 15  - 11, cl, dnt
R7: 11 * (up join to R6) 1 dbp 5 - 5, cl, dnt
R8: 5 + 5 dbp 5 + (folded join to R7) 5 cl, cut thread. 

Now, you are ready to embellish your earring as it pleases you. 

For the daring ones, I tell how I worked my earring. Not a big thing, bit it requires a bit of patience during the work. I like challenges so I tatted in my crystal. I placed all my seed beads on the shuttle and also the crystal blocked with a seed bead, like for the free stamen for the Sakura patern. 
The beads sequence to fill the shuttle is: 25 seed beads, this crystal with the seed bead blocker, 3 seed beads. 
Start from the ring 2 with the 3 seed beads and the crystal + blocker in the loop. When the ring will be closed, the cristal will remain trapped at the base of the ring. Then you must tat  the ring 3... In this case you should not have any folded join. Only take care about the placement of the layered rings. 

Have fun. For any questions I am always around. 
Happy tatting. 


Tuesday, December 16, 2014

Tatting and cabochons

In the Ankars tehnique among a lot of other new elements, apears the use of a cab worked in lace. It does not matter what kind, what form, as long as it fits. Matter of taste too.
The simpliest manner to do it is to tat a front element, with a nice center, that a back side and capture the cab /stone in between by sewing those 2 layers together or joining them by another round of tatting.
The method I found in a Russian forum (the author was Nina Prokoviewich but I think the method belong to Ekaterina Stepnaya) is, in my eyes nicer.
Irina Astratenko has also another method: 1 shuttle, alternating rings with seed beads in between. (work ring, turn work, place bead, work ring, turn, place bead, work ring, join... )
The beads are optional.
To understand the principle: you will tat both sides at the same time, by making some sort of frame.
You need 2 shuttles, because you will want that the threads you use for the rings end at the same point, to you can start the chain. Of course, you can use a shuttle and a ball, but you will need to turn and flip work.
You can choose any type of cabochon. My first try was a rivoli, 5 mm thick. I hesitates a lot to publish this method because I was thinking I am infringing the rights of Marie McCurry, but I am not. By the way: you should pay a visit to her page. Lots of goodies.
So there you go.
 

The last piece was a mother of pearl pendant: 

Needed material:


You start by planning your tatting by copying the shape of your cab and then drawing. Use axes, just draw, imagine how it would be. 1:1 scale is very good. Working with cabochons and designing is not for beginers, you need to know your thread, in order to estimate the ds and to place the joins. Gauge your thread by making rings and chains increasing the ds systematicly. It can help you to plan your tatting. Like this you will have more or less your rough pattern. 

I used for my test the Penny 30. All my rings were 8 - 8 - 8, all my chains were 8 bdp 8 (bdp: beaded diamond picot). 
I choose the pink shuttle thread to work the upper rings and the blue shuttle to work the lower ones. The chains: pink shuttle thread was the core thread. Like this I avoided the thread to make unwanted switches. 
I always start like this. Never a knot. I hide the ends with the first ds. 
Work the first ring with the pink shuttle, do not turn. Take the blue shuttle and work very close the lower ring. Close and turn work. Hold both rings tight and start chain. 
Snug the chain and prepare to work the next set of 2 rings. You will join the upper rings to form 1 round and the lower ones the same. 


You will notice soon that they for the cage for the cab. 

Continue until you will consider necessary for your stone. Make tests from time to time, to estimate how much you need to work. It is better to have it tighter, like this the lace will hold the stone very well in place. You will finish every round normally. 
You will close first the upper rings. Then you will place your cabochon, hold it in place and work the lower ring, make the last joins and you will see already the stone caged in your lace. Pretty uncomfortable this last ring, but possible. Tat the last chain to finish your work. 
Fot the white and lila piece, I worked an extra round.  

I worked another piece with some beads. Not necessarily my thing, but I can show you how you can play after: 


You can decorate this base as you like. 
I would suggest you to start with a round piece and no beads (except the outer round). 
Pay attention when you start any ring. The smallest bare thread between the 2 rings can spoil a lot from your work. 
For a thicher cabochon, just make bigger rings. But still do not plan more ds between the joins because they will tend to go up, and not lay on the stone. 


Tuesday, December 2, 2014

Understanding Ankars

An Ankars piece is easy to recognize. I just found this piece here (you can recall it for sure) and I try to explain some of the distinctive elements. I do not touch the thread used. Only the construction elements or the foundation and the beads.  


1. The stacked rings. 
They are caracteristic for Rina Stepnaya's Ankars orientation. 
There are 2 big groups of this element "ring on ring" : the ROR simple and complexe ones. 
Golden rule: rings must very well closed, snug to get the stiffness necessary, make sure that the front side and back side are "clean", back side must be as beautiful and neat as the front side. You must develop  your way to close these rings. If they are not correctly and completely closed, you will have important issues for the final aspect and the balance of those stacked rings. One reason more to avoid coton, even the best one. 

There is no order how you work them. You can start from the larger ring, work all the joining picots and then the smaller rings, starting from the larger one to the smaller one, joining through the previous ring. No bare thread left between the rings, otherwise they will not pile up nicely. 
In noticed that up join and down join tend to place the rings under or on top of the base ring. For sure, this allows you to make clean joins, no twist for the thread. 
As you notice, a good planing is necessary. 

2. Sewed beads
There is no restriction in using the beads. 1 rule though: best quality beads. The regular shaped ones are kind to you and to your patterns. They are easy to incorporate. But don't stay away from the baroque beads. They bring personality and charm to the pieces. 
Crystals of glass beads: fire treaded ones, to avoid that the thread is cut. 
Easy test for the quality: give them a bath with concentrated soap. If after some hours they did not loose the colour, you can use them. But, again, for some beads you should not jump on the brand new ones... the older ones are sometimes better. 
How to plan them? 
a) you know your thread, and you adapt your pattern to your beads. 
b) you tat the foundation and then search the beads. 

Seed beads should be very regular. You can use them in the lace (godo planning required), sew them, use them as "stoppers" of "buffers" for bigger beads. 

Fire treated. 

No words. But make sure they are the good type. 

Yup, they are welcome. 

Check the quality. 
Sky is actually the limit. 

3. Beading skills are welcome in Ankars. 

4. The seed beads are often tatted in. There are a lot of possibilities, this required a full class. There are more ways to use them than picots or beads on core thread. You would be surprised. 

5. Often there is a central piece, a focus one. In this necklace  it is this cabochon. There are at least 4 ways to do it. Again, a blog entry would be necessary. Trust me, it is not the known way of tat an edging for the front, tat a flower for the back and we put them together with some beads. 
During the class I will give details about all these elements.