Pages

Showing posts with label earring. Show all posts

Thursday, July 16, 2015

Small earring

Remember this one?

Bracelet

I played with the idea and the last one I uploaded. The basic idea is the same: 1 shuttle, all the beads strung previously. And with a crochet hook and some decorating beads, this is all you need.
Remember the small rings? You take 1 bead in the loop before you start the ring, work the ring and close it. The bead will remain on the core thread, at the base of the ring. If you are needle tatting, just work the ring and before you close it, take 1 bead and then close the ring. 

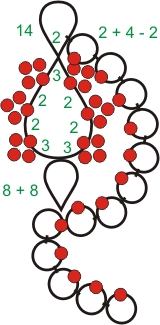
The left diagramm indicates the order of the work, the right one: the ds. Please note that you can adjust at any moment the double stitches and the small rings according to the thread, beads you use. You will feel it while you work it. 
I used a Brildor PB15 thread, a thin polyester (like an 80 size thread) blended with gold metallic Finca thread. 

1: R: 2 - 14, close, do not turn work. 
2: R: 3 dbp 2 dbp 2 dbp 3 - 3 dbp 2 dbp 2 dbp 3, close, turn work.
3: R (with 1 bead in the loop): 2 + 4 - 2, close ring, do not turn work. Repeat how many times you want, until you have a chain you like around the larger ring. Keep in mind that you must have space to work the 4th ring underneath the larger ring. In my case: 8 times. After the last small ring: turn work. 
4: R 2 - 6 + 8, close, turn work. 
5: R: 2 + (the the previous ring) 4 - 2, close ring. Make lock join to the picot from the previous small ring. Continue without turning work for as manny small rings as you wish. Last small ring will be a 2 - 6 one (no picot needed anymore). 
Now you can add the desired beads, by sewing them. 
Small remarks: 
- Do not rush when closing the small rings. It is not always easy to close them all the same. 
- Make the joining picots as small as possible. 
- While sewing the beads, use a fine needle and pass through the beads of the small rings. This will give more stability and stiffness to those chain-like elements.  Especially the longer one may need it. Pass through the bead, hide the thread between the ds, pass through the next bead. It takes time, but it is worth to do it. 

Have fun! 


Tuesday, January 13, 2015

Simple ROR earrings

Those ones were waiting to get a how to tat history... And since I would not like to tempt some tatters to try to estimate, I just rushed a bit with the pattern. Which I promissed anyway.


Skills required: shuttle tatting, tatting with beads, up and down joins. 

Small reminder for the ones liking a neat finish, no twisted picots. Never fight against the thread. This always can punish sooner or later. Better learn the right technique than making compromises to the quality of your lace. Not even when worked "for fun". Yes, I've been told this one too: "We do not work at an academic level, just for fun."
· Up join - marked with + in the pattern (the regular one, the one we learn at the beginning) will make that the ring you are working lay under the rings already worked. Reason: the thread you pull from the left hand to make the joining loop brings the worked ds from underneath the work. You will pass the shuttle also from down towards up.  
· Down join - marked with * in the written pattern: when you pull the thread to make the join, the worked ds are on top of the previous rings anyway and the shuttle passes from left to right ON TOP of the work, so this ring will remain on top. 
That  simple. 

There you go for the pattern. 
1 shuttle project. 
Material needed: thread of your choice (my Penny 30 gave me a 2,5 cm long earring), 28 seed beads (29 for the daring variant, with the tatted in crystal). Beads of your choice for the finish. 

Shuttle, beading threader, fine crochet hook, scrissors, needle (for the finish). Magic thread trick is beautiful, but maybe you would like to place 1 bead and then hide the thread. 
All the picots will be very small picots.

Basic pattern: 

8 rings worked in the given order. 
R1: 5 - 5 - 10, cl, dnt
R2: 10 + (to R1)  20 - 10, cl, dnt
R3: 10 + (to R2) 5 - 5, cl, dnt
R4: 5 + (to R3) 10 - 5, cl, dnt
R5: 5 + (to R4) 5 - 10, cl, dnt
R6: 10 + (to R5) 15  - 10, cl, dnt
R7: 10 * (up join to R6) 5 - 5, cl, dnt
R8: 5 + 10 + (folded join to R7) 5 cl, cut thread. 

The beaded variant requires the use of the beads. Known already: 3 beads in the loop for the ring, 1 from  the shuttle to form this diamond (marked dbp in the pattern).  All rings will start with those 3 beads in the left hand, except the ring 6. Feel free to change it if you prefer it. 
String on the shuttle 28 beads. 

R1: 5 - 5 dbd  1 - 11, cl, dnt
R2: 11 + (to R1) 10 dbp 10 - 11, cl, dnt
R3: 11 + (to R2) 1 dbp 5 - 5, cl, dnt
R4: 5 + (to R3) 5 dbp 5 - 5, cl, dnt
R5: 5 + (to R4) 5 dbp 1 - 11, cl, dnt
R6: 11 + (to R5) 15  - 11, cl, dnt
R7: 11 * (up join to R6) 1 dbp 5 - 5, cl, dnt
R8: 5 + 5 dbp 5 + (folded join to R7) 5 cl, cut thread. 

Now, you are ready to embellish your earring as it pleases you. 

For the daring ones, I tell how I worked my earring. Not a big thing, bit it requires a bit of patience during the work. I like challenges so I tatted in my crystal. I placed all my seed beads on the shuttle and also the crystal blocked with a seed bead, like for the free stamen for the Sakura patern. 
The beads sequence to fill the shuttle is: 25 seed beads, this crystal with the seed bead blocker, 3 seed beads. 
Start from the ring 2 with the 3 seed beads and the crystal + blocker in the loop. When the ring will be closed, the cristal will remain trapped at the base of the ring. Then you must tat  the ring 3... In this case you should not have any folded join. Only take care about the placement of the layered rings. 

Have fun. For any questions I am always around. 
Happy tatting. 


Tuesday, October 7, 2014

Tatted stud earrings and ring

Last week, I think, I posted a pair of earrings and a ring. I just made a test to see how a light grey silver thread will look with some honey gold beads I had (11 Toho Gold Line Jonquille). Simpliest pattern ever, but you know me... simple tatting it is not just simple tatting.
Reasons? More than one.
1. Being a small item, it has to be perfect. This means that is the beads are not even, you do not get the same result.
2. Tattig pattern may be simple, but even knots are required for a small item.
3. Tatting with beads may be mastered, until you must make your joins through the beads. Which is the case here.
4. Folded join through certain beads not for unpatient tatters, at least at the begining. Of course, you can make the alternative join to finish the rosette (the Riego join), but still...

Remember these babies?

1 shuttle project, a very fine crochet hook needed. You need a good amount of beads (48 for every rosette + 12 or 24 for each middle element). Pearls of your choice. 

Pattern for the base: 

Told you. Simple. Just careful. 

bp4: beaded picot with 4 beads (from the ones from the loop)
dp: diamond beaded picot (3 beads from the loop + 1 from the shuttle). 

R1 (with 11 beads on the loop): 8ds, bp4, 4ds, dp, 4ds, bp4, 8ds, close ring, do not turn work. 
R2 (with 7 beads on the loop): 8ds + to R1 (by letting 1 bead between the rings int he lower part) 4ds, dp, 4ds, bp4, 8ds, close ring, do not turn. 
Repeat until you have 5 rings. 
R6: (with 3 beads in the loop): 8 ds + to R5, 4ds, dp, 4ds, join (folded) 8 ds, close ring. 

Work now the central element.
Start ring with 6 beads in the loop. Work 1 ds make picot with 2 beads (1 from the loop, the other one from the shuttle) 2 ds. repeat until you finish the beads from the loop, finish with 1 ds, close. 
You can also change the amount of ds, depending on your beads. 

For the ring I just made diamond picots instead of these double beaded picots. 

I worked with 30 Penny thread (like a 40 Lizbeth thread) and 11 Toho rocailles. With a different thread size and other beads, the appearance may be different. 

Mount the elements together. If you have stud little pearls, they are perfect. You can even think about working more of these elements to make them as exchangeble sets, why not?
I hid the head of my stud with another small flower (3-6-3 petal) for a better finish. 


Have fun!


Monday, September 23, 2013

10 minutes tat

I had to finish the thread on a shuttle, so I played.

Pattern for a simple pair of earrings
1 shuttle pattern.
Fun fact: you can stop after various phases and you will still have something interesting.
Not difficult at all, fast to be done and if you have a young pupil, it is perfect to give it to her during the class... She will not feel that she made the folded join or the lock join, promise! 
I choose to make these instructions like this, with pictures, I know it helped me a lot when I found something in this form. Honestly, I spent more time by taking the pictures and to process them than for the actual tatting. 


This is all you need. The bead has a large hole, large enough to let the chain pass through.
Secure the begining of the chain with a paper clip.
Start to tat the chain.
60 ds.
Of course you can change the amount of ds as you like, this part will hang anyway behind your bext element.

What you need now is to place the bead. Mine has 1,5mm hole, enough to be strung on the chain.
Remove the paper clip and string the pearl.

Make join lock to close the chain and to form it as a ring.

Now start the flower.
7-7-7-7 in my case. I have a very fine thread, so my flower vill have max. 2 cm diameter.
Without the picots for the upper ring now you have a small ring, or pendant, right?
I continued. Still you can stop at this point, you will still have something to make a finished object.
But I continued. Now this could be a pendant… Or with a pearl still an earring.
But I finished my flower. I wanted it a six petal one.
Why? You can fold it, see?
And if yo add a pearl in a ring, it is happy enough.


Small, simple things may bring a lot a satisfaction. Remember when you made the first flower? This is the feeling you will never loose. I don't know you, but after I finish the simpliest flower, I take a break to feel it in my hands. Dumm enough.

Back to the pattern topic. I wanted to start to make some. Mined field, I know. I have already submitted 2 of them in my Etsy shop. They are very simple.

One of them is a beaded rosette. The pattern is simple but in the instructions I put clear explanations (diagrammed ones) of the beads placement on the shuttle (for 1 and for 2 colors) and the possible variations. It can be a pendant or, with some variations, a nice beaded snowflake.

The second one, is a flower, an orchid. This time it has the visual pattern and the pictures of the different prases.

Have fun! And if you decide to give a try to this 10 minutes pattern, please let me know. I am curious to see all your ideas, you are all sooo creative!

Sunday, August 18, 2013

Earrings with pearls

Everything added while tatting, this time.


1 shuttle and 1 ball / 2 shuttles
Thread used:  Anchor Freccia 20
4 mm pearls
4 seed beads 11 size
A tool to string the pearls
A paper clip

String the 4 seed beads on the ball (or the second shuttle).
T1: Start from the second ring of the first trefoil, like we will finish with a ring.  
R1: 6 + 6 – 6 – 6 close
R2: 6 + 6 – 12 close and turn work.
Take 1 seed bead from the ball /second shuttle, bring it at the base of the trefoil and start chain 9 – 9. Make lock join to the upper picot of the trefoil.  Turn work.
Take one 4 mm pearl string it on the ball thread, secure it with the paper clip.
Start chain: 8 – 8, tighten the chain. Carefully take out the paper clip and make lock join.  Do not turn work.
Start chain 9 – 9. Turn work.

T2. Start the second trefoil, as the previous.  The first ring will have a join where the chain and the pearl have the lock join. Finish the trefoil. Turn work.
Bring 1 seed bead from the ball at the base of the trefoil and start chain 9 – 9. Tighten.
String one  4 mm pearl on the ball’s thread, secure it with paper clip, tighten and start chain 8 – 8. Turn work. 

T3. Start5 trefoil. 12 ds, join both, pearls and picot from the previous trefoil, finish the trefoil. 
Turn work. Bring a seed bead fromt he ball /second shuttle at the base, start chain 9 – 9. Lock join to the trefoil. Do not turn work.
String one 4 mm pearl, secure with paper clip and start chain 8-8, tighten chain, lock join to the pearl. Do not turn work. 

Work chain 9 – 9. Turn work. 

T4. Start trefoil. Work 12 ds, join with the pearls and previous trefoil, finish trefoil. 

Turn work. Bring the last seed bead of the base of the trefoil, start chain 9-9. String one 4 mm pearl on the ball’s thread, secure as before… Do not turn work and start chain 9 – 9. Turn work.
Cut the thread from the ball and start a ring (12 +6+6+6). With this ring you can hide the end of the thread cut from the ball. Work 12 ds join both pearl and picot, folded join to the first ring you worked, 6 ds, close. Finished.

Please feel free to adjust the amount of ds according to your pearls. When you make the first time the chain around the pearl, work the chain until you are, more or less at the half of your pearl, make the picot and finish. Like this, the distance between the pearls and the chain will not be too big.

To string my pearls, I used this broken guitar string given by my son. See in the other post what I am talking about. 
This is my prototype, without seed beads. It is stable, does not twist. The seed beads are not only ornamental, they allow you ti bring toghether the 2 threads for a better finish. With my thread it got a nice shape.
There might be some mistakes. Please let me know if there is something difficult to follow.