Pages

Friday, July 19, 2013

Swap fever

I got the first introduction to the swap idea some time ago. I wanted to give it a try, so I put my name on the list. The hard part was about to come, working for it. It is one thing to give life to your ideas freely, just let my shuttle to make the ds as they fit better and a completelly other thing is to think: does it fit? does it bring some joy?
Preparing a present for someone you know is sometimes hard, but for a complete stranger is for me even harder.
I put up my head and hands to work ant I made a shy tatted necklace and a bracelet. Simple lines, no picots, just pearls and golden chain. The necklace is not symetric and the pearl in the center floates somehow but that's the charm of it...


For the second swap (yes, there was a second one too), I got bolder. A white and royal blue neclace with pearls. All tatted, Ankars style, ring on ring method. It was not the first time I used this pattern. My wrist watch has it, in a more complexe variant. 
There are 5 elements all put toghether. The flowers and the split chains, the lateral sides and the central element (the one from the pattern from the last blog post).
Result? 


The pattern for the central part is here, I just added a small blue flower underneath, a bigger white one to give it a nice aspect on the backside too and I left 2 petals on the upper part of the element. I sewed them togheter, joined the chains with a pearl element and this was it. Chouchoutte loved it... I hope. 
I forgot, of course, to write something about the technique... It was taken for some sort of macramé, not that far away, I would say, also knots, wright? And we can also finger tat... 

Now I struggle with pearls... all the way... I made some test patterns, I will have to make some research if they are not already done. I miss somehow a good personal library with all kind of elements nicely organized. I always am affraid that the ideas I have may have been published already... The white flowers are similar to the camelias pattern, without the use of teh seed beads... 
The orange flower is to be disregarded... it is just a test to see how this thread works with white glue for fixing... So far, so good. 


Saturday, June 29, 2013

Game of beads

I make all kind of tests, I play with a lot of ideas... Sometimes I end up by spoling thread and time, the beads I can always re-use. I should, once, take a snapshot of my table (it is the coffee table in front of the TV)... It is full of cut ends, tests, loose seed beads. A mess, I have to admit.
I learned my lesson the hard way: I play, learn, test with bad thread. When I am happy with the result, I will make the same pattern with a better thread.
The last two pieces are a bracelet and a necklace. They wait for the clasps and I will make them in other colours too.


For the bracelet you can recognize the starting pattern idea. I am pretty happy with the small flower, it enhances a bit the effect. 

The necklace started a a test and the idea got somehow body. Guess I am now in playing with beads mood. Still thinking about a pearl for the pendant...
Both of the patterns I will make them in white and in black for sure.

Pattern for a small element

I am still in the search of patterns... all day long. But the ones I want, the Ankars ones, are nicelly hidden, for a good reason. I found some, like all of the ones interested in it, but just copying is not that funny.
The patterns wich really helped me understand were the one I call "for dummies"... the picture ones. I guess they have a name, did not find it yet.

So I played with my tatting and my phone camera. I put the result toghether in a pdf file. It is just an element of a bigger piece, the tricky part of it. It involves the ROR, both of them. It is not that difficult, but there are some parts where full attention and a lot of patience are needed.

Pattern and instructions for a small tatted element. I used it as a lower part of a earring pair.
The thread used for the pattern is not the ideal one, a polyester thread  brings a better effect. 


Here you have the link, since I have no idea how I can upload a PDF file in the blog. 

Please let me know if there is something to correct. 


Wednesday, June 5, 2013

Necklace "Joie" pattern

I wanted to made some time ago a tatted bracelet. I saw a nice Ankars bracelet from Maranta and I want to do something similar. Of course it is far away from the original, I am not at that point ... yet. Short story: I started as a bracelet, after the beads it shrunk somehow so it ended up as an asymetric necklace:

I made it out wit orange silk thread and then sewed the beads (cristals, pearls and coral beads).
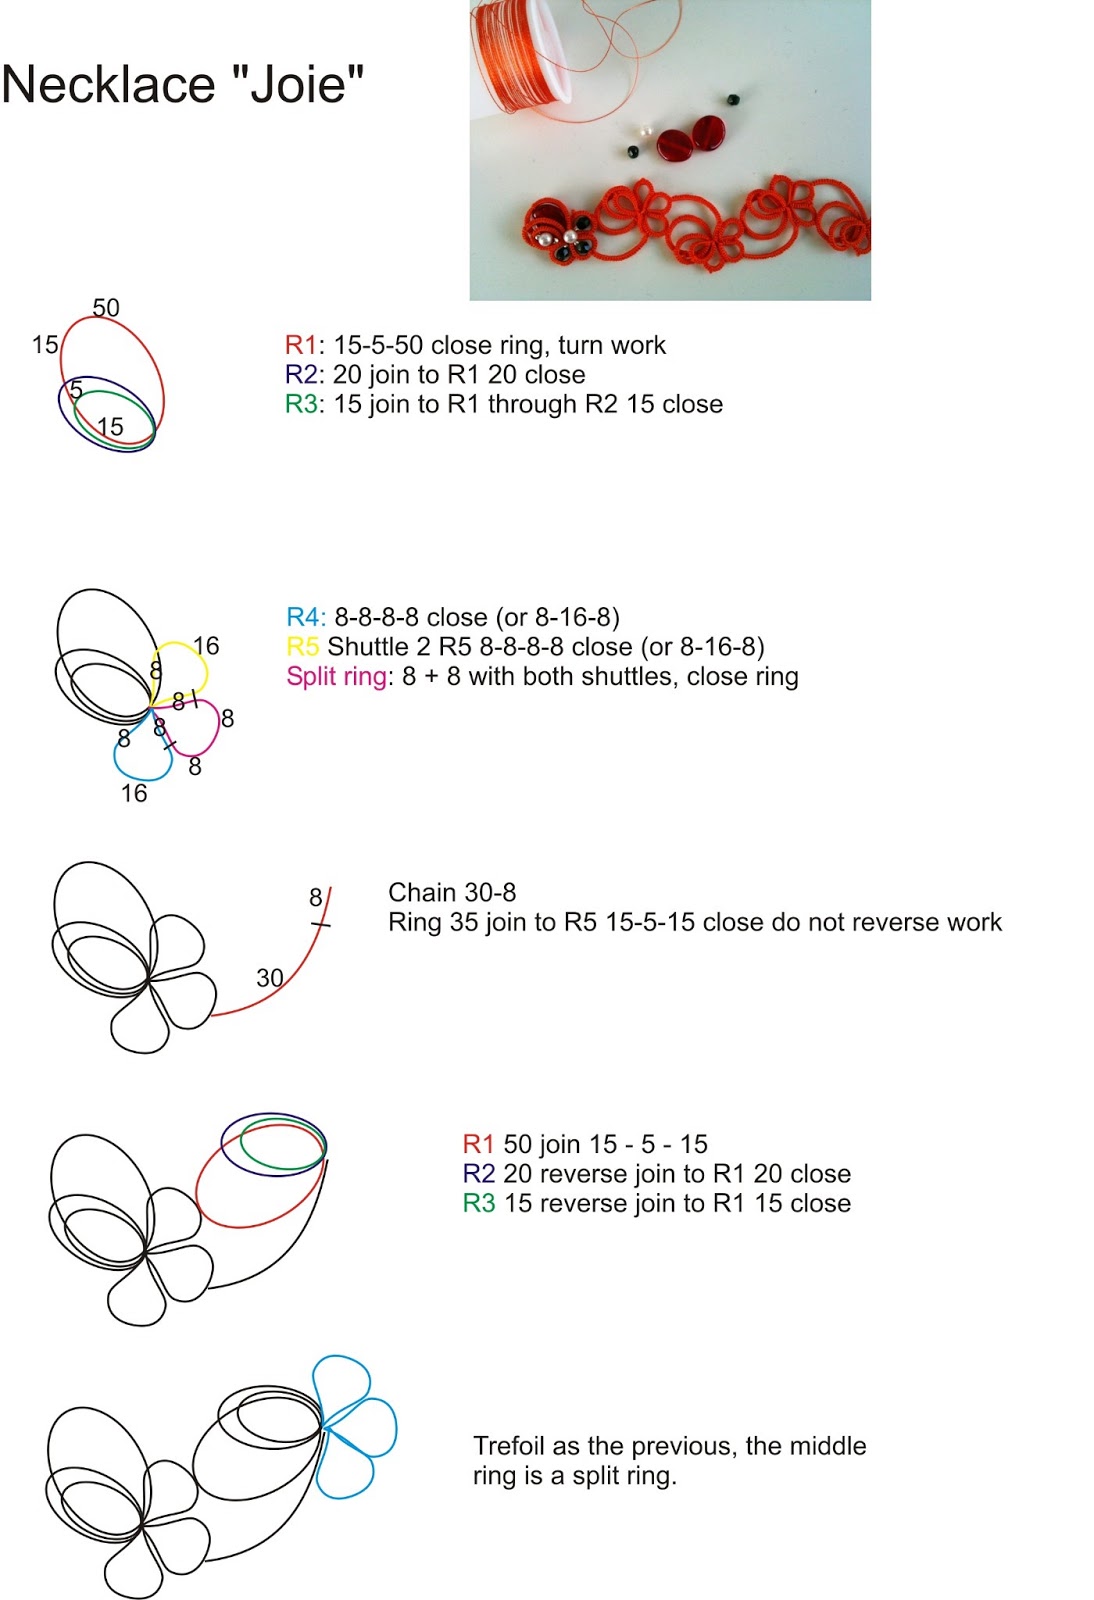
It is a 2 shuttles pattern, because it has split rings in.
Here is the rough pattern:
The first part is easy, if you are familiar with the complexe ring on ring method. The difficulty comes at the second part of the chain. In order to make the rings on the same side of the work, you have 2 possibilities. You work the bigger ring (the one marked with red) and then:
a) you don't turn work and work the rings 20 - 20 and 15 - 15 and join them with reverse join..
b) you turn the work, and work the rings (making sure that they are aligned UNDER the big ring) with normal join.
The second way was difficult for me and the rings did not close as I wanted them to close... You could make it better, I'm sure.
It will happen every second element...
As you see, for the trefoil you can choose to make or not the picots (8-8-8-8 or 8-16-8). After the split ring,  do not reverse work. The chain should be like this:
Of course you can change the number of ds as it pleases you, especialy for the chain. If you have a good thread wich allows you to work a stiffen lace, you will have no problem with larger chains. I was also tempted to join the bigger ring to the chain, but I did not like the effect.
Once you have the lace, you can play with the beads.

Tuesday, April 30, 2013

Template attempt

I was asked to post the template for some of the small things I make. I never really bother to write down my ideas, I just tat them as they want to come out.
So I choose the Elements set and tried to make the pattern for it.


This is not that complicated. As you see, the element repeats itself. This is the reason I choose this one. 

To make the lace, you can use this: 
R1 : 10 - 7 - 39 - 15 close ring
turn work
R2: 17 join to R1 17 close ring
R3: 10 - join to R1 through R2 10 close ring
R4: 15 join to R1 15 close ring

Turn work
Use the same sequence for the second part of this element. 
Make sure that your picots are made at the right place.
If it is easier for you, you can work the fourth ring on the upper side of the lace, but you will need to to make an inverse join. 
I would advice to let both 15 - 15 rings at the end, like this the element closes nicely. 

As you notice, there is no bead added yet. According the Ankars technique, you will sew them, as many as you want, where you want. 

Mine was like this, sewed with the same thread as tatted. Make sure your sewing will be like for the hiding the ends. As for the beads choice, I would do the lace first and then pick the pearls. or you can tat the first ring so your preffered bead fits in. 


Please let me know if there are some mistakes in the pattern, it is my first attempt.

Saturday, March 2, 2013

Ring on ring exercice turned into a bracelet

Since quite some time I want to learn the Ankars technique. I felt that there is more than tatting and sewing in it, but I had the confirmation while I was attending the on-line Ankars class with Nina Libin (Big, big THANK YOU to Georgia Seitz).
The material is a bit different, it has to allow to work tighter stiches and very, but very large rings. From the beggining on, my coton perlé was not the best choice for it. You can see easily why, in the picture bellow.
The first class was about the ROR (Ring on ring) technique. The simple ones, we know them from the layered rings. I found a very good example here.
The complex variant of the ROR is not that difficult, in my eyes. The first picot on the larger ring is used to join the first layered ring, and the second picot serves to join the third ring (through the second ring!). And, voilà!

I had to practice. My first problem were the large rings, the 49 - 7- 7- 14 ring was a true killer, because I tat anyway tight, but doing it tighter, as Nina Libin told us, made the job very difficult for me. After the class I grabed the shuttle with my Lavsan thread and did the exercice. Did not work at first. Small breack, a short, angry look at the shuttle: IT HAS to work! So I wrapped a larger amount of thread and started a ring. Yes, the 49 ds one... Because I did not have to pull the thread to enlarge the loop so often, my stiches got more even, the thread did not have any unwanted twist and I was able to close a nice, huuuge ring:

I used then this for a bracelet, done with silk thread: 

The first part of the element is done. The second one is mirrored.

Reverse work
Ring 10 ds - 7ds- 15ds- 15ds -15ds close reverse work
Ring 17ds join to large ring 17ds close
Ring 10 dn join to large ring 10ds close

You should make sure that the smaller rings stay below the bigger one. I tried the other way around, it is possible, but working them under the bigger ring is easier for me.

I left a larger amount of thread to sew the pearl.
The bracelet has six elements like this.

It is not spectacular, but I'm happy about the result.I was suggested that a nice pair of earrings and a necklace will do a nice set.


Friday, March 1, 2013

Alison edging variations

I have an Pinterest account, like most the Internet users. It is not only a personal collection, it is, for me, a way to organize what I want to do.
While browsing for patterns I found this edging (click on the image, you will get to be-stiched.com page):

Allison edging

What I did, was to adapt the double stiches for my beads and changed the orientation of the chains. I did not use any bead for the tatting, the pearls are sewed, like in the Ankars technique.
This is the base of my Duchess set (bracelet and earrings):

The pattern for the bracelet would be:
Ring 16 ds cl rw
Ring 10 p 10 cl do not reverse work
Chain 8 - 8 join to picot rw
You should end up with the chaines on the both sides of te rings, one on the left, the other one on the right side.
The picot of the first chain will serve as a join picot for the second side of the bracelet. It will let you a gap, just right for a bead to get in.

The earrings have the same pattern. The trick is here:

Hope it helps a bit.
If there is a mistake in the pattern, please let me know. I wrote it down from memory. I should really make notes of what I do, like this I would have, sometimes, less stress...