One box we are stuck in sometimes is the way to add the beads. They must come from the thread from the hand, from the shuttle or the needle or is has to stay on a picot. Really?? Not this time.
I tricked it. I am not the first one and there are more than 1 way to have this effect but the simpliest one, at least for me, will be described today.
This rosette has 2 rounds. The inner one as pretty easy.
|
Image
|
Steps and remarks
|
|
What you need:
Your thread. In my case, Penny 20 this time. 11.0 rocailles, a very fine crochet hook and a beading needle. Or any needle which allows you to pass 2 times through a 11.0 rocaille.
String on the shuttle the beads you need. you must think: 8 beads for each petal. In my case, I needed 7 petals... 56 beads. Just put enough beads on the shuttle to be on the safe side. I was sure I will get a 6 petal flower... I had to unwind the shuttle and add the missing beads...
Prepare to work the inner round. Take 11 beads on the hand and work ring.
|
|
|
|
Work 8 ds 4 bp 4 ds 3bp (2 from the hand, 1 from the shuttle) 4 ds 4bp 8 ds, close ring.
4bp: 4 beads picot
3bp: 3 beads picot
Do not work these beaded picots too tight, you will want to have some thread for the next joins.
|
|
|
Petal 2 until 6:
take 7 bead on the hand.
Work 8ds join to the beaded picot by separating the beads (3 up, 1 down) 4 ds 3bp 4 ds 4bd 8 ds, close ring.
|
|
|
Intermediate phase.
|
|
|
For the last petal taker only 3 beads on the hand. You will make the last join as a folded join. Do not let yourself impressed by the beads.
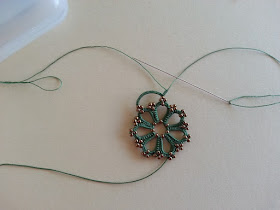
Finished first round. Cute enough actually like this.
|
|
|
We attack the second round now. I placed the small rocailles on top the the picots with 3 beads... This is where I want them to be.
Therefore, I let my shuttle away and I use a needle. Remember? The needle supposed to be able to pass through the 11.0 rocaille 2 times... But please keep in mind: the bead will have 1 thread in the hole... when you pass with the needle you will have in that little hole 1 time the diameter of the needle and 3 times the diameter of the thread. When I will explain how it will be done, you will see.
Anyway, because of this simple math and some tests I had to use for this round Penny 30, a thinner thread.
The needle will be used as a shuttle.
|
|
|
Thread the needle, let enough thread on the needle. It will be you core thread for the outer round. Don't make economy on it... you have some joins too. Do not cut the thread. You will work with the ball too.
Take 1 bead, keep the rosette in place and bead and pass the needle through the 2 beads on top.
|
|
|
Now pass the needle back through the bead. Fasten.
|
|
|
Done. Not hard, no science involved.
Now you can start to work the chain. Needle tatters will be disappointed: I am tatting with flipped ds.
|
|
|
I use for this the Riego tatting method. (Please correct me if I am wrong.)
First movement / first hs
Wrap the thread on your left hand and prepare to work chain.
Pass the thread from the neddle on the left side of the active thread (the ball) and bring the needle under the active thread as shown in the picture. Pick the needle, make the flip.
|
|
|
Second movement / second hs
Bring the needle from right to the left, pass it under the active thread. Make the flip.
Congratulations: you just made a ds using a needle as a shuttle.
Again: I did not invented it. I guess it was already done before me.
|
|
|
Easy peasy. I do not give you any ds count for the chain. It depends so much on your thread... My Penny 30 wanted 26 ds to lay flat...
Take 1 bead, place it, continue...
|
|
|
Have fun.
|
I hope this is not that difficult. It is actually fun and you will notice how wasy using the needle this way can be. The same movements I use also when I am finger tatting...
Let me know if you do not understand some steps. I will try to answer as soon as possible.


Facendo l'angelo avevo bisogno di più filo, ho semplicemente lasciato il pippiolino con due perle molto comodo (la terza era già sul portanodi) col filo di rame ho tirato il p. tra le due perline nella quarta e mi sono attaccata con un normale lock join.
ReplyDeleteSmart! This is what Emilei Del wanted to make to!
DeleteLovely flowers, I like the beading on the flower. Thank you for sharing your ideas
ReplyDeleteMargaret
Beautiful! Thanks for sharing Corina :). Good to see you are still tatting :).
ReplyDeleteGlad to see you posting, I was thinking that I haven't seen you for a while! Hmm. I always like your beading ideas and the different solutions you give. I may have to try this.
ReplyDeleteThat is beautiful!!! :)
ReplyDeleteThank you.
ReplyDeleteVery nice!
ReplyDeletethank you for the tuto!